Minecraft texture editor
Содержание:
- Что нужно знать для качественного текстурирования 3D моделей?
- Editing textures[]
- Getting Started[]
- Права плагина :
- Оптимальные программы для текстурирования
- Server Resource Packs[]
- Preface[]
- Server Resource Packs
- Как менять, что менять?
- Creating a resource pack[]
- Packing and installation[]
- Frequently Asked Questions
- Завершение и создание ресурс пака для Minecraft Optifine
- Скачать плагин Force Resourcepacks
- Maybe you want to know
Что нужно знать для качественного текстурирования 3D моделей?
Авторам трехмерного дизайна стоит знать, что конечный потребитель – это основной фактор, который нужно учитывать для создания качественной текстуры. Основной потребитель этого продукта — это обычные игроки или любители кино. Поэтому стоит понимать, справится ли железо пользователя с готовым продуктом. Создание широкоформатной текстуры рассчитано пользователей с мощными компьютерами. Только хорошее железо сможет показать вашу работу во всей красе. С другой стороны, создание низкополигональных текстур будет резать глаз и явно не порадует пользователя в процессе игры или просмотра фильма.
Создавая текстуру нужно учитывать, что она должна соответствовать объекту текстурирования. К примеру, мы хотим текстурировать металлическую поверхность. Значит ее рисунку нужно придать соответствующие параметры:
- Цвет;
- Блеск;
- Блики;
- Отражения.
И прочие атрибуты металлической поверхности. Идеально проработать текстуру в простом техническом редакторе довольно трудно. Так или иначе придется внести несколько правок в ходе работы. Упростить работу можно используя специальное ПО для 3D текстурирования.
Editing textures[]
terrain.png in 13w01b, the last version to actually use this file.
The textures are in the Portable Network Graphics (PNG) format and can be edited with any image editing program that can handle the format including transparency. There are many different programs that support this, some free ones include Paint.net (Windows) (which even Notch uses), GIMP (Windows, Mac, Linux), Paintbrush (Mac), and many more. Edit each PNG file as desired and save them with 32-bit color depth to preserve transparency.
Although Microsoft Paint does not handle transparency, it can still be used to make/edit textures. Basically, if you open a PNG image in Windows XP, a window should pop up showing transparency as a white and gray checkered pattern . There is a tool located on the tool bar that should have a screen tip with ‘Change to transparent’ or something similar. Go into Microsoft Paint and create/edit your texture(s). Find a color not used in the texture, and fill in the white space with it. Then, select the area desired to copy and paste it onto the PNG image. Paste it onto your PNG image and make sure to cover it completely. Simply change your unwanted color to transparent using the tool mentioned earlier, and every last pixel of that color on the current document will be changed to transparent. Beware, make absolutely sure that you do not click the wrong color, as this may mess up all textures in the document.
Getting Started[]
Making a Resource Pack
Minecraft has a unique mechanic that allows for text and media files to be added to the game files that allow for everything from custom block textures and models to custom credits and sound events. This tutorial is meant to help with setting up the file systems in order to implement them. Since the files are essentially code, there are technical rules for how to format files and certain things may change from version to version. As such, what is written in this tutorial may not apply to every situation, but in the case where the difference is significant and specific, it will provide a framework on the changes needed for different versions.
This tutorial is geared toward the latest release of Minecraft, which is currently 1.17
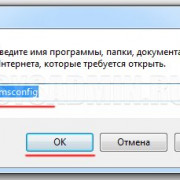
{
  "pack": {
    "pack_format": 7,
    "description": "My Resource Pack"
  },
  "language": {
    "LANG_COUNTRY": {
      "name": "My Custom Language",
      "region": "Country/Region name",
      "bidirectional": false
   253 }
 252 }
251}
Tools
Creating custom files for Minecraft, whether in the forms of resource/data packs or mods, is somewhat technical and can be difficult. There are many rules that must be followed in order for add-ons to work correctly, most notably how the files are formatted. There are many tools that can help mitigate these issues, some of which are listed here.
IDE
Making a resource pack involves creating JSON text files, which can be tricky to use and format correctly. Many IDEs (Integrated Development Environment) assist with formatting these files and making sure proper syntax is used, as well as help organizing files in a project. Here are some suggestions:
Notepad++ — A very lightweight IDE. very easy to use
Права плагина :
forceresourcepacks.command — Доступ к команде /frpforceresourcepacks.command.reload — Доступ к /frp reloadforceresourcepacks.command.generatehashes — Доступ к /frp generatehashesforceresourcepacks.command.version — Доступ к версии /frp
forceresourcepacks.command.usepack — Доступ к /usepackforceresourcepacks.command.usepack.others — Отправляйте ресурспаки другим игрокам с помощью команды / usepackforceresourcepacks.command.usepack.porary — Выберите, является ли выбранный ресурспак только временным или должен быть сохранен и применен повторно
forceresourcepacks.command.resetpack — Доступ к /resetpackforceresourcepacks.command.resetpack.others — сбросить ресурспаки других игроковforceresourcepacks.command.resetpack.temporary — Сбросить параметр,в котором учитывается должен ли ресурспак только временно сбрасываться, а не сохраняться
forceresourcepacks.command.getpack — Доступ к /frp getpackforceresourcepacks.command.getpack.others — Получить приложенный пак других игроков
forceresourcepacks.command.getstoredpack — Доступ к /frp getstoredpackforceresourcepacks.command.getstoredpack.others — Получить сохраненный ресурспак других игроков
forceresourcepacks.command.packusage — Доступ к /frp packusage
forceresourcepacks.command.addpack — Доступ к tpo /frp addpackforceresourcepacks.command.pack — Доступ к /frp pack для редактирования ресурспаков
forceresourcepacks.command.assignment — Доступ к назначению /frp для добавления и редактирования назначений сервера / мираforceresourcepacks.command.deleteassignment — Доступ к /frp deleteassignment для удаления назначения сервера / мираforceresourcepacks.command.globalassignment — доступ к /frp globalassignment для просмотра и редактирования глобального назначения
forceresourcepacks.pack.<имя ресурспака> — Предоставляет доступ к ресурспаку с помощью команды / usepack, вы можете определить эти разрешения через config.yml для каждого ресурспака.
forceresourcepacks.updatenotification — получение уведомлений об обновлениях в игре
forceresourcepacks.bypass.required — Обходит требование ресурспака ресурсовforceresourcepacks.bypass.<назначение>.required — Обходит требования к ресурспака для конкретного заданияforceresourcepacks.bypass.<действие> — Обойти определенное действие для всех статусов и назначенийforceresourcepacks.bypass.<status>.<action> — пропустить определенное действие для определенного статуса во всех назначенияхforceresourcepacks.bypass.<назначение>.<действие> — Обойти определенное действие определенного назначения для всех статусовforceresourcepacks.bypass.<assignment>.<status>.<action> — пропустить определенное действие для определенного статуса определенного назначения
Оптимальные программы для текстурирования
На ваш выбор представлены три редактора для наложения текстур. Рассмотрим каждую по отдельности, оценим плюсы и минусы.
Autodesk Mudbox
Mudbox – профессиональная техническая программа для 3D моделирования анимации и текстур. Ей активно пользуются разработчики игр и трехмерной графики для фильмов. Продукт управляется интуитивно, что явно относим к плюсам. К минусам отнесем высокие системные требования. В целом, Mudbox может все, что нужно для разработчика: проработка и смешивание слоев, фильтры участков, встроенный ассортимент шаблонов, кистей и прочих инструментов. Суммарные возможности обеспечения позволяют создать реалистичные трехмерные модели и сцены. Отличная совместимость ПО с популярными графическими редакторами типа Photoshop.
Плюсы:
- широкий набор инструментов позволяет создавать реалистичную графику, обрабатывать растровые материалы;
- простой интерфейс;
- широкая совместимость;
- есть бесплатные версии.
Минусы:
завышенные системные требования.

3D-Coat
Простой, но эффективный редактор для работы с низкополигональной графикой. Немного скудный набор инструментов компенсируется скоростью работы. Эту техническую программу текстур можно использовать на видеопроцессорах серии NVIDIA Graphic. ПО позволяет легко, практически без затрат времени обрабатывать растровые изображения небольших размеров. Встроена функция экспорта файлов растровых изображений, развертки и радиального наложения. Узнать о продукте подробнее можно на сайте разработчика.
Плюсы:
- простое и шустрое ПО с достаточным набором инструментов для работы с трехмерной графикой;
- есть бесплатные версии.
Минусы:
- сложный интерфейс;
- ограничение редактора под работу с низкополигональными рисунками.

The Foundry Mari
Западные пользователи по достоинству оценили это ПО и считают его одним из лучших для текстурирования трехмерных моделей. В этой технической программе разрабатывали графику для проектов:
- Район №9.
- Игра Эндера.
- Аватар 2012 года.
Данное приложение использовали для разработки текстур в различных игровых сериях. Программа удобная благодаря индивидуальной настройке интерфейса под конкретного пользователя и огромному функционалу. Но требовательность к системе и отсутствие пробной или бесплатной версии портят все впечатление.
Плюсы:
- обширный функционал для текстурирования;
- возможность индивидуальной настройки интерфейса;
- интуитивность в обращении.
Минусы:
дорого и требовательно.
Server Resource Packs[]
If you are the owner of a server, you may set it as the resource pack of your server.
- Make sure your pack format is a .zip-folder.
- Open the server.properties with a text editor.
- Search for the line «resource-pack=».
- Paste the download link after the equal sign.
- Optional: Set the «resource-pack-sha1» hash sum of the pack file.
- Save your changes to the server-properties and restart your server.
- Enjoy!
Servers can have an icon that will show up in the Multiplayer list.
- Create a PNG image with a size of 64 by 64 pixels, transparency is supported.
- Save (or rename) it to .
- Move it to the server’s directory.
- Restart the server.
- Server icons will display next to the server name.
Preface[]
Resource packs allow users to include files that can modify or add custom textures, models, animations, music, sounds, user interfaces, and languages that change the way some things in Minecraft behave or look.
What NOT to do
There are some things that you should NOT do when creating a resource pack / texture packs, which includes but is not limited to:
- Release files that allow users to play a release of Minecraft without having purchased it from Mojang.
- Release the decompiled source code of Minecraft in any way.
It is also suggested that you never extract game files to your desktop, as it can result in technical issues.
Server Resource Packs
Если вы являетесь владельцем сервера, вы можете установить его в качестве пакета ресурсов вашего сервера.
Убедитесь, что формат вашего пакета — это .zip-папка.
Загрузите пакет на веб-сайт хостинга файлов, например Dropbox.
Скопируйте ссылку для скачивания вашего пакета
ВАЖНО: это должна быть прямая ссылка для скачивания. Например, в Dropbox URL-адрес будет заканчиваться на «dl = 0», поэтому, если вы используете Dropbox, все, что вам нужно сделать, это изменить его на «dl = 1»
Открыть сервер. свойства в текстовом редакторе.
Найдите строку «resource-pack =».
Вставьте ссылку для скачивания после знака равенства.
Сохраните изменения в свойствах сервера и перезапустите сервер.
Наслаждайтесь!
На серверах может быть значок, который будет отображаться в список многопользовательской игры.
- Создание изображения PNG размером 64 на 64 пикселя, поддерживается прозрачность.
- Сохраните (или переименуйте) его в .
- Переместите его в каталог сервера.
- Перезапустите сервер.
- Иконки сервера будут отображаться рядом с именем сервера.
Как менять, что менять?
Для того, чтобы редактировать текстуры — вам понадобиться редактор изображений с поддержкой прозрачности (paint не подойдет) и хотя бы начальные знания по пользованию этой программой. Из самых популярных это photoshop, также есть gimp и еще множество других программ.
Если у вас уже стоит подходящая программа, то вам нужно взять некоторую текстуру за основу. Если вы хотите делать все с нуля, то можно взять стандартные текстуры: default.zip (cкачиваний: 4311)
Распаковываете архив и получаете папку подпапками и картинками. Дальше вам нужно лишь найти соответствующую картинку и отредактировать ёё.
Давайте рассмотрим, структуру папок и что вы там можете найти:
| terrain.png | Самый важный файл — текстуры блоков. Лежит в корне |
| pack.png | Иконка вашего текстурпака, которая отобразится в списке текстурпаков в игре. |
| pack.txt | Подпись вашего текстурпака, которая отобразится в списке текстурпаков в игре. |
| ctm.png | Файл для объединения блоков. Например, если поставить 2 сундука рядом, то получится двойной сундук. Или соединения стекол. |
| particles.png | Текстуры частиц. Огоньки, эффекты от зелий и прочие маленькие штуки, которые летают в воздухе. |
| achievement | Папка с текстурами для интерфейса и иконок достижений. |
| armor | Папка с текстурами брони (chain — кольчужная, cloth — кожаная, diamond — алмазная, gold — золотая, iron — железная). Также присутствует файл witherarmor.png, относящийся к мобу Иссушитель и power.png — текстура эффекта, когда в вас или моба ударила молния. |
| art | Папка содержит 1 файл с текстурами картин. |
| environment | Папка с текстурами облаков, дождя, снега и освещения. |
| gui | Папка с текстурами интерфейса игры, а также текстуры предметов в items.png. |
| item | Немного особых предметов типа стрел, вагонеток, дверей, сундуков. Также есть текстура шариков опыта (xporb.png). |
| misc | Папка разных текстур: цветовые гаммы, смена дня и ночи, освещение, текстура воды. |
| mob | Папка текстур мобов. |
| terrain | Луна и солнце. |
| title | Логотип и фон в меню. |
Creating a resource pack[]
All the resources and instructions in a pack reside in the pack folder, which lives in the «resourcepacks» directory. You may wish to use an IDE to help keep track of the files within your resource pack if there are multiple.
In versions 1.11 and higher, all file names within a resource pack should use lowercase letters only.
Creating the Folder
The first thing we need to do is create the folder that will contain all the resource pack files. Create a folder on your desktop or another easily accessible location and name it . This will eventually be the name displayed in the resource pack menu.
Creating a .MCMETA file
Within your resource pack folder, we need to create a file. This lets Minecraft know that the folder is a resource pack and contains useful information such as:
- The recommended version for the resource pack.
- The description displayed under the pack title in the selection menu.
- Preliminary information on any custom languages added in the resource pack.
To create this file, we need to create a text file within the folder and name it . Make sure the file extension is and not or the pack may not be detected. When renaming you may get a warning that changing a file name extension could make the file unusable or may switch the program required to open it. You can still open this file in a text editor by right-clicking the file and selecting the «Open With» option. Note: You may need to select a program using your file browser.
Formatting pack.mcmeta
Open in a text editor or IDE of your choice and type or copy+paste the following:
{
  "pack" {
    "pack_format" 7,
    "description" "Tutorial Resource Pack"
  }
}
The value of tells Minecraft what release the resource pack is designed for, and is different for certain versions. The following list what versions each value is associated with:
- for versions 1.6.1 – 1.8.9
- for versions 1.9 – 1.10.2
- for versions 1.11 – 1.12.2
- for versions 1.13 – 1.14.4
- for versions 1.15 – 1.16.1
- for versions 1.16.2 – 1.16.5
- for versions 1.17.x
- for 1.18 snapshots
Note: As more updates are released, values may be changed or added.
The text following is displayed under the pack title in the selection menu, and must be put inside quotes . If you wish to use special characters, you can enter the Unicode code for the character in the format , where is the Unicode hex code for the character. Say you want to use the letter Þ (Thorn), which has code . Inside the description you would type . Make sure that you are using the correct slash, or it may not work. A list of Unicode codes can be found here. Note: Only the characters 0000–FFFF (Basic Multilingual Plane) are supported.[citation needed]
Correct syntax
Be very careful not to forget quotation marks , colons , braces , or square brackets . Missing one of these can lead to your resource pack not being detected by Minecraft. Make sure that your file matches the one shown above.
Testing your Pack
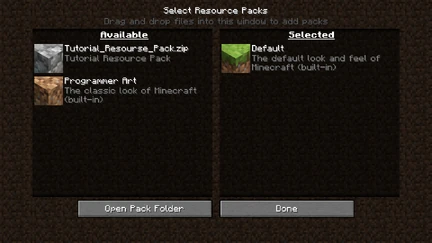
If your resource pack is formatted correctly, it should appear in the selection menu like this.
At this point, you can test if the pack is formatted correctly by putting it in the game! To do this you must place your resource pack folder in the Minecraft pack folder. You can access it by selecting «Options», then «Resource Packs», then «Open Pack Folder», or you can navigate to it from your file browser:
- For Windows, right click on the start button → run → type in %appdata% → .minecraft → resourcepacks
- For MacOS, go to Library → Application Support → minecraft → resourcepacks
- For Linux, go to ~/.minecraft/resourcepacks (/home/<username>/.minecraft/resourcepacks)
Once you have the folder open, you can drag your custom pack folder and drop it in.
If you have formatted the files correctly, you should see your resource pack appear in the menu.
Troubleshooting
If you don’t see your pack in the list, make sure your file is correct and saved in the folder. Look for any missing braces , commas , colons , quotation marks , or square brackets . Remember that for each open brace, quotation, or square bracket, you must have a closing brace, quotation, or square bracket.
If an icon is not specified, a cobblestone icon will show up next to the pack. If you want to use your own pack icon, you can place it inside your resource pack folder with the name . The file must be a PNG, and works with any square resolution, but a 128×128 pixel image renders the best.
Packing and installation[]
Once you are done editing, create a zip file of the files modified (or, in Minecraft 1.3, you can use a folder with the files too), preserving all folder hierarchy. The root folder of the zip must have the files and folders listed below, or else they will not be changed. If you find that nothing changes when you select your texture pack, make sure that the files are in the root of the zip and not one folder in.
Windows
Select all the files (edited or not) Then choose the 7-zip or WinRAR option after right clicking and select «Add to archive…». The archive will open, and you can name the file. Then hit «OK», and the program will make all the files into a zip archive. To put into minecraft, simply start the launcher, log in, and at the title screen go to the button «texture packs». In the lower left, click the Open Folder button and drag your ZIP into the folder. Select your texture pack, and view it on your computer.
Mac OS
Highlight all the files in your folder, right click, and click «compress (#) items». A new file called «Archive.zip» should appear. Rename the file to your liking. Go to Finder>Library>Application Support>minecraft>Texture Packs, and drag your .zip in. Now you can use your texture pack by selecting the button «mods and texture packs» in the main menu of minecraft, and clicking on your pack.
Ubuntu/GNOME
Folder Layout
~/appdata/roaming/.minecraft/resourcepacks/MyPack/(assets etc.)
In Terminal, run this command…
cd ~/.minecraft/resourcepacks/ && zip -r MyPack.zip MyPack
…then launch Minecraft and enable the resource pack.
Frequently Asked Questions
How to create Minecraft textures?
- (Optional) Open a vanilla Minecraft texture in Photoshop or a similar app as a starting point, or skip to the next step.
- Create a new document at the same texture resolution as your first texture file (base color and opacity map). …
- Create working layers for the metallic, emissive, and roughness map. Paint what you want and make any edits in these layers. …
- Make sure to place layers of each map type into layer groups. This is important for the next few steps.
- Right-click on the Metallic layer group and select “Blending Options”.
- Uncheck the green (G) and blue (B) channels:
- Click “OK” to close the Blending Options window for the Metallic layer group.
- Right-click on the Emissive layer group and select “Blending Options”.
- Uncheck the red (R) and blue (B) channels:
- Click “OK” to close the Blending Options window for the Emissive layer group.
- Right-click on the Roughness layer group and select “Blending Options”.
- Uncheck the red (R) and green (G) channels:
- Click “OK” to close the Blending Options window for the Roughness layer group.
- Once you have the metallic, emissive, and roughness map layers looking the way you want, it’s a good idea to save your Photoshop document using the name of the …
- Use the Save As command to save a .PNG texture file that can be used by the game. Note: Again, file naming is important at this step. …
- You have successfully created the second of 3 texture files for a complete PBR texture set.
How do you download Minecraft texture pack?
Download a «Minecraft» texture pack that you like. Load «Minecraft» and select the option «Mods and Texture Packs.». Click «Open Texture Pack Folder» and drop the download file from Step 1 into the texture folder. Enter a game and the new textures will be in place.
How do you change texture in Minecraft?
How to change textures in Minecraft. Go into minecraft and click on Mods and Texture packs, once their click on open texture pack folder and paste the .zip file in their. Minecraft will automatically load the pack. 4. Go back to minecraft and select the texture pack from the list 5. Load up your save or start a new game to enjoy your new graphics…
Завершение и создание ресурс пака для Minecraft Optifine
Можно создавать практически любые модели, но в рамках возможностей редактора, конечно же. К примеру… сделать курицу размером с гиганта или переделать вообще всё полностью с нуля. Для результата главное чтобы совпадали имена групп (то, что с иконкой папки в редакторе). Я решил просто сделать курицу более курицей.
Лучше стало?
Теперь обсудим текстуру. Вы можете оставить так, но тогда модель будет искать текстуру в той же папке, что и она сама. Т.е. для использования своих текстур их можно просто закинуть в assets\minecraft\optifine\cem. Но тогда ваша текстура не будет реагировать на текстурпаки. Нам это не нужно, так что удаляем текстуру из проекта и через File -> Export -> Export OptiFine Jem делаем экспорт модели в свою cem папку.
Теперь нужно выделить pack.mcmeta, pack.png, папку assets и запаковать в zip архив.
Кидаем это чудо в resourcepacks и активируем в игре. Для примера я использовал вместо иконки своё старое лого, так как под руку попалось именно оно. Но это мелочи, главное чтобы работало.
Активируем свой пак и заходим в мир
Скачать плагин Force Resourcepacks
Скачать плагин версии Force Resourcepacks 1.11.8
Данный файл могут скачать только пользователи с группой Gold Повысить аккаунт до GOLD
Скачать плагин версии Force Resourcepacks 1.11.7
Данный файл могут скачать только пользователи с группой Gold Повысить аккаунт до GOLD
Скачать плагин версии Force Resourcepacks 1.11.6
Данный файл могут скачать только пользователи с группой Gold Повысить аккаунт до GOLD
Скачать плагин версии Force Resourcepacks 1.11.5
Данный файл могут скачать только пользователи с группой Gold Повысить аккаунт до GOLD
Скачать плагин версии Force Resourcepacks 1.11.4
Данный файл могут скачать только пользователи с группой Gold Повысить аккаунт до GOLD
Скачать плагин версии Force Resourcepacks 1.7.22.1
Данный файл могут скачать только пользователи с группой Gold Повысить аккаунт до GOLD
Maybe you want to know
› Mcpedl Mods Jurassic Craft
› Minecraft But Crafting Is Wide Mod
› Mods For Minecraft Education Edition Pc
› Minecraft Wiki All Crafting Recipes
› Mixed Media Crafts
› Mini Block Craft Hack
› Minecraft Education Edition Mod Pack Download
› Miniatures Crafts
› Metal Crafts
› Minecraft Education Edition Free Mods Download
› M Centres Launcher Minecraft Download
› Mothers Day Crafts
› Mattel Minecraft Crafting Table
› Miniature Birds For Crafting
› Minecraft Crafting Quiz V2
› Metallic Craft Paint Colors
› Miss Lavenders
› My Craft Source Reviews
› Mason Jar Crafts
› My Craft Channel Online
› Mediafire Download Minecraft Free Mods
› My Dream House Craft Game
› Minecraft Diamond Crafting Recipes
› Minecraft Insane Craft Ssundee Mod
› Minecraft Crafting Table Online
› Minecraft Crafting Randomizer Addon Bedrock
› Minecraft Mods For Education Edition Download
› Mason Jar Snowman Craft Ideas
› Minas Morgul Crafting Instances
› Minecraft Crafting Grid Mod
› Minecraft Item Crafting List
› Minecraft Rl Craft Server Download
› Museum Of American Arts And Crafts Fl
› Mushroom Craft For Kids
› Manual For Craftsman Air Compressor
› Mission Arts And Crafts Furniture
› Minecraft Education Edition Gun Mod
› Minecraft Pixel Generator
› Minecraft Custom Crafting Datapack Maker
› Minecraft Scramble Craft Server
› Minion Crafting Recipes Hypixel Skyblock
› Memory Foam For Crafting
› Minecraft Rlcraft Download For Xbox One
› Mini Block Craft Download Apk
› Mason Jar Craft
› Minecraft Giant Crafting
› Minecraft Education Edition Hack Client
› Munson Landing Craft For Sale
› Minecraft Mod For Crafting Recipes