Объяснение сюжета и концовки resident evil village
Содержание:
- Moreau
- Heisenberg
- Village
- Miranda
- House Beneviento
- FAQ And What You Need To Know Before You Play Resident Evil 8 Village
- Дробилка
- Кабинет
- Полезные советы для боя с Моро
- Underground (Mines)
- Resident Evil 8 Village Story Campaign Walkthrough
- Женщина-кукла
- Urias
- Village 2nd Visit
- Moreau’s Area
- Sturm
- Общая могила и Сад
- Urias Strajer
- Resident Evil Village Trivia, Lore, And Opinions
- Бой с Сальваторе Моро: советы и стратегия
- Lady Dimitrescu
Moreau
Now you fight Moreau in this drained area. Like Lady Dimitrescu the best way to damage him is by shooting his “normal” body that is located in the mouth of the giant fish part. Keep backing away and shooting it when you can, watching for when he lunges or spews goo at you.
After enough damage is dealt he will climb onto the top of one of the buildings. When he does this you want to quickly get underneath one of the covered areas marked with the yellow cords and paint. Moreau will start spewing goo into the air, which comes down as rain that damages you if you aren’t in one of the covered areas. This also spawns goo blocking the paths around the area which you have to destroy if you want to move to other spots during the fight.
After that, he comes down again and you can keep damaging him like normal. Depending on how long the fight goes for he may go on the rooftops again, in which case you just hide again under the covered areas.
Once he is defeated follow the newly opened path into the tunnel which leads to the room you originally saw Moreau in when you obtained the flask. Grab the key piece off the table, then examine it to combine it and obtain the key. You can use it on the near gate, then head back to the village.

Heisenberg
The first part of the Heisenberg fight you are driving around the vehicle you are on, using it to attack the Heisenberg. You can block melee attacks the same way you normally, then shoot either a machine gun or a cannon at the boss. To deal damage you need to shoot the red glowing points located on either or his arms and one at his base. If you’re trying to avoid damage you should shoot the points only using the machine gun, then use the cannon when he starts moving to attack you because it staggers him and interrupts his attacks. The fight while on the vehicle basically doesn’t change, just keep shooting the glowing red points as they appear.
After enough damage is dealt he will knock you off the vehicle and you will be on foot. You now need to continue damaging him with normal weapons by shooting him in the face. Avoid attacks by staffing to the side or moving close to him, and keep damaging him until the fight ends.
Village
Ethan wakes up at the wreck of the vehicle he was being transported in. Follow the linear path through the forest (don’t worry about the flashlight being pointed at the ground, this is only for the first part of the game). When you reach a building go inside and through to the basement and open the cabinet at the end, then turn around and go back out of the building and continue following the linear path.
Continue following through path through the village until you enter a house again and pull back a curtain to meet your first village resident. They give you a weapon, then you end up in the basement and can continue following the linear path. After the next scenes end you will have your first enemy encounter. Deal with the Lycan, then go inside the house it came out of and into the pantry to pick up , then use them to open the gate in the yard.

Go into the house in front of you then upstairs and grab the handgun ammo off the shelf. This starts the large Lycan ambush that you need to deal with. Go back downstairs and move the shelf in front of the door, then one enemy will appear inside the house that you need to deal with. The growling outside will subside and you can move the shelf and go back out the front door, then follow the blood trail on the ground into the next building. Once you enter the Lycan will start attacking again, and you need to drop down the ladder to the lower area and go out into the next village area.
Here you have to survive for a period of time before the game progresses. You can barricade yourself in another house for a while, then climb up on the roof if needed. You need to wait until after Urias appears (the big Lycan with the hammer) then run down the path with the water in the middle through the buildings to trigger the end of the ambush, where you will be shot with an arrow then all the Lycan leave.
After the scene with the Hag, you need to find two crests to get through the gate to the castle. The first one, the is located in the nearby church. After grabbing the crest, continue through the Fallow Plot to the building at the end. Climb through the window, then over the wall, and open the gate. After more scenes go up to the front door of the house. When you are in the first room of Luisa’s house you will just need to hang out for a bit, then follow her into the next room. After more scenes, you will be in the garage. Go into the other room into the kitchen and open the green drawer to pick up the , then rotate and exam it to obtain the .
 |
 |
Go back into the prior room and use the on the hut in the front of the yard to obtain the .

Go back through the Fallow Plot and to the gate past the church. Place the in the left spot, and the in the right spot, rotated to match the image on the rest of the gate.
 |
 |
Follow the path through the gate, then pull the switch to the right of the door in the next area.
Miranda
Now all you have left is Miranda, the final boss of the game. She stays mostly human-shaped for the entire fight, so you deal damage by just shooting her in the head or body. After some time she will start changing forms, switching to one with a number of large spider legs carrying her around, then one where she flies in the air. In the spider form, you avoid her the same when she’s on the ground, then if she jumps to a higher platform you need to start running around the room to avoid when she tries to jump down on to you. When she flies around she will sometimes dive at you, or summon either one large or three small brown orbs that float over her head. You can shoot these balls to destroy them, but if you don’t they will light on fire and be shot towards you. She will then rotate through these three forms during the fight.
If a number of black pillars appear out of the ground and a large brown orb in the middle you need to hide behind one of the pillars. The orb in the middle will light on fire and start sending small flaming orbs outward that damage you if you aren’t behind a pillar.
Sometimes the entire area will darken making it hard to see. When this happens Miranda will hide in the darkness in normal form, and you need to find her when she appears and attack her to allow you to see normally again.
After enough damage is dealt she will grab you and hold you in place, while summoning a large brown ball above her. You need to quickly shoot this ball to blow it up and damage Miranda. Once you have successfully done this she will start attacking you while still held in place, and you need to keep damage her to kill her and end the fight.
This concludes our Resident Evil Village Walkthrough.
More Guides:
- Resident Evil 8 Village Wiki & Strategy Guide
- Resident Evil 8 Village Collectibles Guide
- Resident Evil 8 Village All Treasure Locations & Solutions
- Resident Evil 8 Village All Cooking Ingredient Locations
- Resident Evil 8 Village How to Unlock Infinite Ammo Cheats
- Resident Evil 8 Village Trophy Guide & Roadmap
« PrevResident Evil 8 Village Wiki & Strategy GuideNext »Resident Evil 8 Village All Collectible Locations (Goats, Files, Recipes, Outhouses, Windows, Weapon Parts)
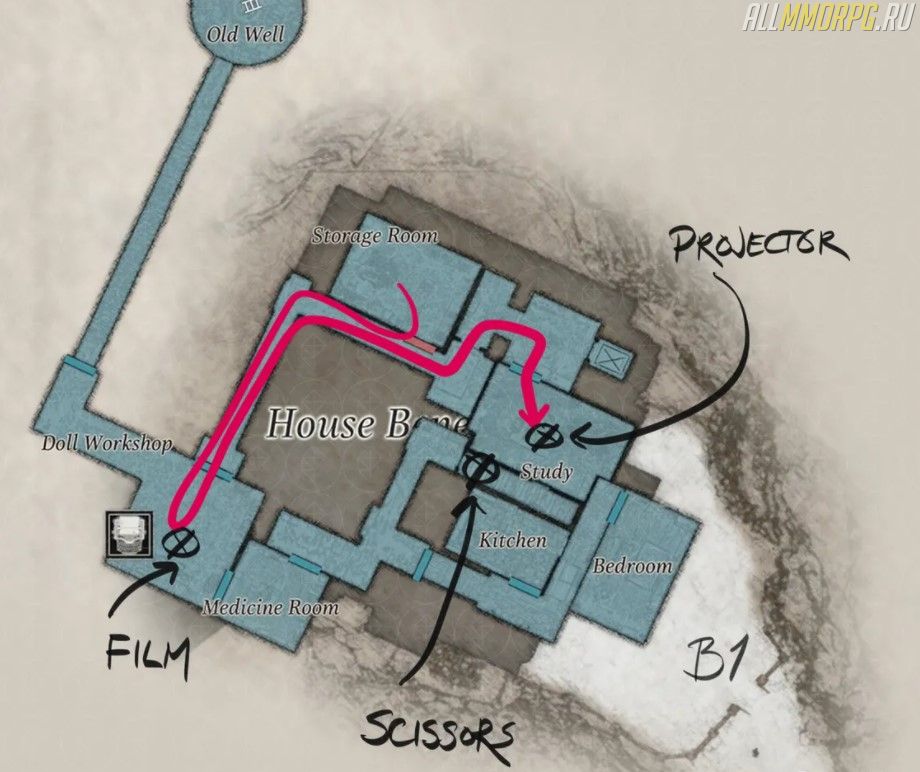
House Beneviento
Follow the linear path to the end where you reach a door. Interact with the drop slot and choose to place the from your inventory into the slot. Continue down the path and enter the house. Go through the door at the back of the main room, then down the hallway to the left and down the next elevator. Follow the hallway to the end, and interact with the flask sitting on the doll.
All your weapons are now gone, and you need to solve a series of puzzle to get out of the area. First, you need to interact with the large doll on the table to get some items to proceed. Interact with the right shoulder and move your hands to pull a section off, obtaining the . (You can skip this step if you want to save time).
 |
 |
Next go around the other side and interact with the left leg, pulling it off to obtain a .
 |
 |
Finally, interact with the left hand to pull off the . (You can skip this step if you want to save time).
 |
 |
Use the on the nearby door, then interact with the sink twice, the second time selecting the from your inventory, which makes Ethan wash it off, obtaining the . Go into your invetory and inspect the ring to get the code 052911. Use this code on the paddle on the door you entered the doll room from to get back out into the hallway.
 |
 |
Go down the hallway and into the first door on the left. Interact with the music box, then use the to open it. You now need to move the slots the cylinders are in to make the music box work. Use the scratches you can see on the cylinders to get them in the correct order. When you successfully match them you obtain .
 |
 |
Go back into the doll room and interact with the mouth of the doll, moving it all the way obtain. When prompted use select the to obtain the .
 |
 |
Go back down the hallway again all the way to the end where you enter a study. Interact with the hanging film, then select the out of your inventory to place it on the stand. Interact with the stand again and move them into the order based on the clue on the paper to the left. The correct order is: Bear, Book, Rose, Music Box, Ring. Play the movie, then a door on the other side of the room opens.

Go into the wall and grab the from the doll on the right. Use them to cut the bandages blocking the path. Follow the hallway to the end, unlocking the door which gets you back into the room with the sink.

Go over to the large doll again, using the to cut the bandages on the torso to obtain the .
 |
 |
Now in this room go down the hallway to the left where there is a door with a picture on it. Interact with it and place the , then interact with the other to spots. Change the top left to the bird pointing to the right with wings going left (press once), then the bottom one to the three closed eyes (press twice).
 |
 |
Follow this passage to the end and then climb to the bottom of the well to find a .

Go back to the prior room and start going down the hallway until you see the baby. You will now need to avoid the baby while progressing. Go back to the doll room and wait behind the table until the baby enters the room, then go around the opposite side of the table that it starts going to chase you (can also take the path through the other hallway too). Go all the way to the end of the hallway to the elevator and use the on the breaker box to obtain the .
 |
 |
Go into the study and back through the spot in the wall into the hallway, then to the doorway on the left where you can place the to open it.

Go to the end of this new hallway to the bedroom, then interact with the box on the wall to obtain the .
Go back down the hallway you came through again until you here the baby chasing you again, then turn around and go back into the bedroom and hide under the bed. Wait for it to enter the room and start moving around the bed, then you can crawl out the front and run down the hallway. You need to go left and take the long way back to the elevator through the doll room because the right path is blocked.

Interact with the fuse box and place in the , then quickly get inside the elevator when it opens and push the button to close the door and go back upstairs.

FAQ And What You Need To Know Before You Play Resident Evil 8 Village
There are a lot of things to understand before playing RE8, including getting the unlockable game modes, and whether or not you need to Resident Evil 7: Biohazard before this new game. The answers to those questions are complicated than you might expect, but we’ve got all of the information you need right here.
- Do You Need To Play 7 First?
- How To Unlock Mercenaries Mode
- Ending Explained: Where Will It Go Next?
- How To Get The Courtyard Key
- How To Complete The Bell Puzzle In Dimitrescu Castle
- How To Survive Your First Lycan Encounter
- How To Start NG+
- Mercenaries: Tips To Get SS Rank And Higher
- All Mercenaries Rewards And Ranks
Дробилка
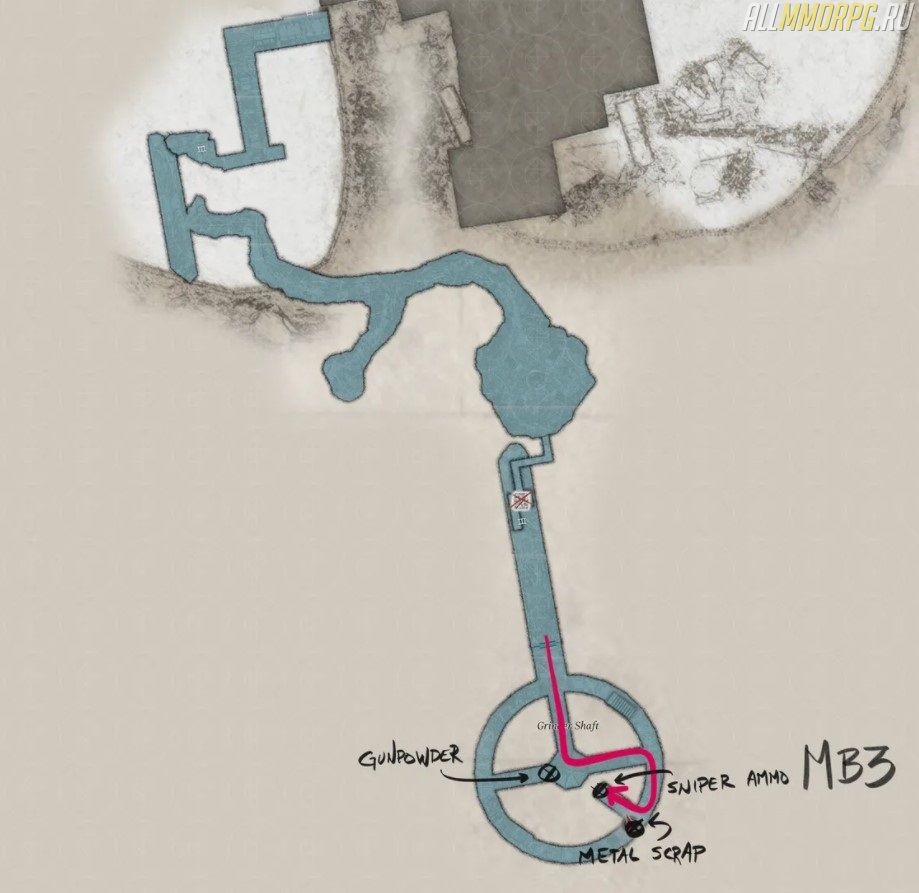
Идите вперед и поверните направо (на запад). Там вы найдете порох. Поворачивайте на восток и следуйте по дорожке направо. Заберите ржавые обломки и патроны для снайперской винтовки в ящике.
По мере того, как вы будете подниматься к огромному вентилятору-дробилке, разбивайте оранжевые индикаторы, чтобы остановить механизм. Их всего четыре – три по бокам и один в самом центре измельчителя.
Дойдя до второго уровня, вы столкнетесь с двумя солдатами, оснащенными реактивными ранцами. Убежать от них будет затруднительно, так как они способны перелетать с мостика на мостик. Лучше всего сначала подорвать их с помощью мин, а после добить из дробовика, целясь в уязвимые места (красные пятна). Когда будете двигаться на юг, подберите обломки металла и леи из ящика в тупике.
Дойдите до самого верхнего мостика, сломайте ящик и заберите фугасные снаряды. После карабкайтесь по лестнице вверх к лопастям дробилки, которые к тому моменту уже остановятся. Осмотрите площадку наверху, заберите леи из ящика и выходите через дверь на востоке.
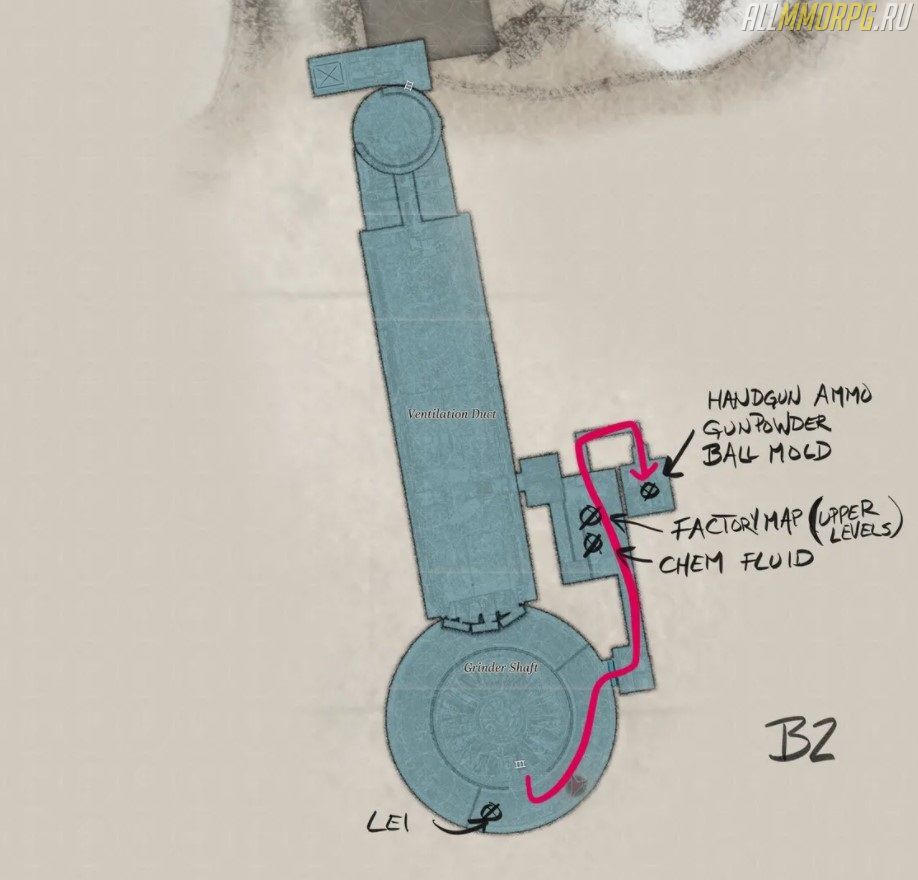
Поднимитесь по лестнице, сверните направо. Обыщите ящик, возьмите реагент и прочитайте заметки с данными о создании модифицированных солдат. Информация из заметок пригодится вам, чтобы эффективнее убивать таких монстров. Покидая помещение, заберите карту верхних уровней фабрики.
У северной стены отодвиньте тележку с дороги и пролезьте по воздуховоду к закрытой комнате. Возьмите патроны для пистолета из ящика и форму для отливки шара из кейса. Вернитесь в воздуховод, идите назад и идите по лестнице вверх.
Кабинет
Возьмите пинцет, вернитесь в кукольную мастерскую и достаньте изо рта куклы фрагмент кинопленки. Теперь идите вместе с ней в кабинет – комнату справа от лифта.
На столе лежит записка. Прочитайте ее. На ней написано:
«Наша счастливая семья
Лучший друг Розы во всем мире.
Ей очень нравится эта сказка.
Самое важное для нас на этом свете.
Подарок на свадьбу от бабушки.
Доказательство вечной любви от Итана ко мне».
Теперь осмотрите проектор и подставку с фрагментами кинопленки. Чтобы решить эту головоломку, вам нужно разместить фрагменты кинопленки в правильном порядке.
По порядку слева направо:
- Изображение обезьянки.
- Книжка со сказкой «Деревня теней».
- Изображение маленькой Розы.
- Изображение музыкальной шкатулки.
- Изображение руки с обручальным кольцом.
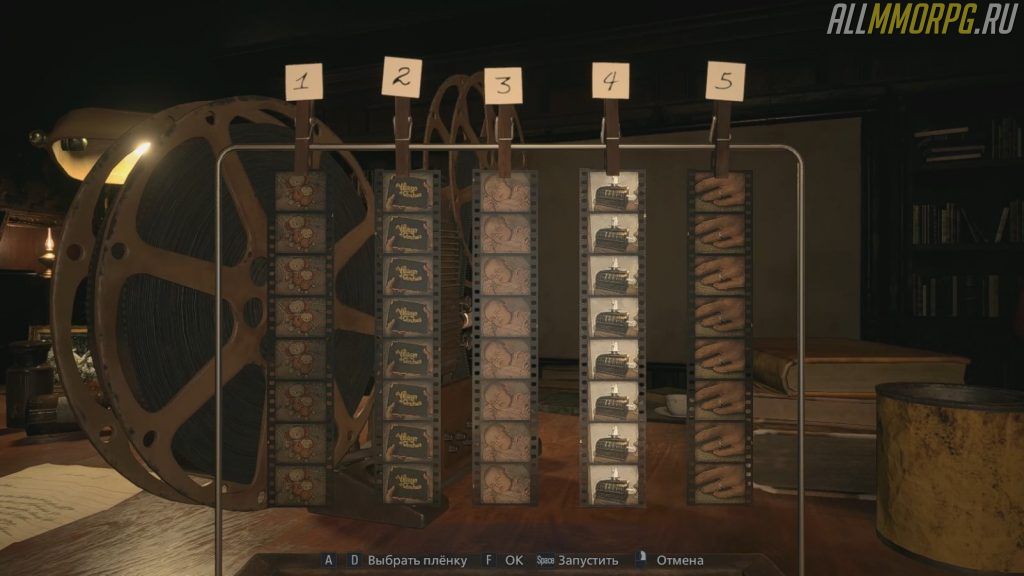
Сделав все правильно, воспроизведите фильм. После этого за стеллажом откроется проход. Войдите внутрь и поверните в проходе направо. Возьмите у куклы на полке ножницы.
Полезные советы для боя с Моро
Чтобы вам было легче убить Моро, воспользуйтесь нижеприведенными советами:
- Используйте дробовик, когда стреляете в уязвимое место босса. К моменту боя с Моро у вас должно быть достаточно патронов на этот тип оружия. С его помощью вы нанесете много урона и, возможно, сражение закончится раньше, чем он использует свою сильную способность второй раз;
- Постоянно двигайтесь. Несмотря на то, что площадка довольно большая, на ней легко попасть в тупик. Если босс зажмет вас в углу, он будет бить вас вблизи и нанесет огромный урон, из-за чего вы потратите все лекарства и умрете на фазе с ядовитым дождем;
- С умом взрывайте бочки. Выжидайте момент, когда Моро подойдет к ним на близкое расстояние. Это ваше основное оружие в битве с монстром;
- Не забывайте про крафт. Если у вас закончились патроны, остановитесь и откройте рюкзак. В это время бой становится на паузу и у вас есть время изготовить боеприпасы и выпить лекарство;
- Внимательно следите за анимацией босса. Перед использованием ядовитого дождя тело Моро краснеет. Между этим эффектом и изрыганием слизи на крыше проходит много времени, которого достаточно, чтобы найти укрытие.
Underground (Mines)
After the scenes, you will be handcuffed and running away from the Lycans chasing you down. Follow the largely linear path, breaking the boards in your way when needed. When you drop into the large square room with the door at the end you will need to avoid the spike roller to continue. To do so, turn around and face the direction you entered the room from, and the spot to hide will be in the right-hand corner. Wait for the spike roller to move all the way towards you and you will be free from the handcuffs, then follow the path out of the area and you will be back where the switch was. After pulling it, follow the path through into the castle.
Resident Evil 8 Village Story Campaign Walkthrough
We’ve gone through the entire game so you don’t have to. Below you’ll find a complete walkthrough to every section in Resident Evil Village, in order, so you never have to get stuck for too long. Just read through our guides below for everything you need to know.
Village Area Walkthrough
- Part 1 — The First Fight And Getting The Bolt Cutters
- Part 2 — Maiden of War, Graveyard, The Field, And The M1897 Shotgun
- Part 3 — Heisenberg’s Trap And Meeting The Duke
Castle Area Walkthrough
- Part 4 — Castle Dimitrescu, Maroon Eye Ring, And Sanguis Virginis
- Part 5 — Castle Dimitrescu Mask Locations And Hall Of Ablution Statue Puzzle
- Part 6 — Castle Dimitrescu Treasure Map And The Five Bells
- Part 7 — Find The House With The Red Chimney
- Part 8 — House Beneviento, Music Box, And Wooden Mannequin
Heading To The Factory Area Walkthrough
- Part 9 — GM 79, The Boat, And Powering Up The Sluice Gate
- Part 10 — Get The M1851 Wolfsbane Magnum And Claudia Beneviento’s Grave
- Part 11 — W870 TAC Foregrip, Optional Torch Puzzle, And Hairy Miniboss
- Part 12 — Heisenberg’s Factory
Женщина-кукла
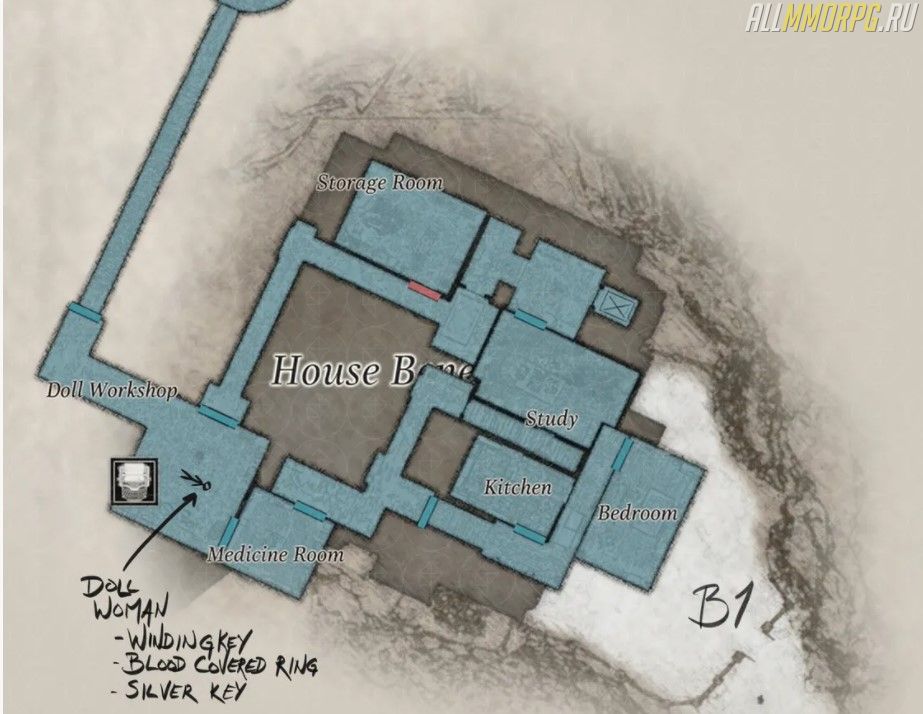
Посреди комнаты на столе лежит кукла-женщина в натуральную величину. Что делать с ней:
- Осмотрите ее левую ногу. Исследуйте конечность вверх по голени, пока рука Итана не окажется на колене. Отсоедините ногу и достаньте из колена заводной ключ.
- Осмотрите левую руку куклы и снимите окровавленное кольцо.
- Осмотрите бинтовую повязку на груди. Ее можно разрезать чем-то острым.
- Посмотрите фотографию на столе.
- Осмотрите рот куклы. Внутри что-то лежит. Чтобы достать это, нужен специальный инструмент.
- Осмотрите левый глаз куклы. На глазном яблоке нарисовано изображение ворона, летящего направо.
- Осмотрите правое плечо. Проследуйте до плеча и отсоедините руку. Внутри лежит серебряный ключ.
- Осмотрите и отсоедините правое предплечье. Внутри руки есть металлический предмет, на котором изображено три закрытых глаза.
Urias
Now you need to fight Urias, which is the huge hammer-wielding Lycan from the ambush at the start of the game. He starts up on the raised platform, and whenever he is up there will perform an attack where he jumps down towards you with a hammer swing. Then he will normally follow you around in this lower area, doing various swing combos and attacks depending on how close you are. You can avoid swings by standing on the opposite side of the large stone pillars, until the point where he sometimes will grab them and throw them at you. After enough damage he will climb back up on the middle platform and do a roar, which summons 1 – 2 normal Lycans to also bother you. For damage just keep shooting him in the face if possible until you defeat him.
After he’s dead go through the newly opened door and continue until you get to the room with the television where you can pick up the , the last of the four. After the scenes follow the path out and use the boat, then climb the ladder to get back into the village.

Village 2nd Visit
Break the lock on the door, then follow the path to a scene with the Hag. After it is finished, open the chest on the table to obtain the . Use it on the gate, then follow the path back into the village. After some explanation from the Duke, you need to go back into the village to the house with the red chimney. The gate to the southeast of the statue in the “Maiden of War” area is now open and you can go through that area. Follow the path to the gate with the “Do Not Enter” sign and break the lock, then go into the building on the left. The cabinet at the end has a combo lock on it that uses the code 070408, and inside you can find the M1911 Handgun as well as the .

Go back and use the jack handle on the jack under the tractor to lift it and get through to the next area. Take your next two rights to a spot with a gate where you can use the , then climb the ladder on the next building which is the one with the red chimney you were looking for. Go inside and open the chest on the table, which contains a key piece you examine, combing it to obtain the .

Return to the Duke, and you will now be able to go through the door to the north side of the area the Duke is in.
Moreau’s Area
In the village you can now use the key to go through the gate leading South from where the Duke is. Follow the small river running down the middle area to a wall of green goo, which you can damage to destroy and proceed further. Break the next one to climb a ladder and get into the area with the windmill. Go inside and down the stairs all the way and down the lift.
In the next area go down the tunnel to the left with the tracks on the floor, then up the stairs and squeeze through the gap to obtain the after a cutscene.

Go back the way you came, then a left and then immediately right to go up some stairs. Hit the wood where the yellow tape is to make a path going forward, then follow it to the end of the area where there is a house building by a tree. Inside the building on the left you can grab the .

Go back the way you came again and take a right when back in the first area to get outside. Follow the path to the end where you can use the on the boat in the water, then drive it through the two tunnels. After the cutscenes you will be on a dock in the water, follow the path to the pumphouse building. Continue out the other side and down the path towards the windmill. Using the crank on this one breaks it, so continue down the ladder inside this windmill.
In this next section, you traverse the water-filled area over submergible platforms that the transformed Moreau will continually swim through trying to get you. Wait for him to go by before going on platforms. To get to the next set of buildings you need to break some supports to drop platforms, and you do this on the tower by also shooting the yellow taped part on the left with a gun from that side.

Go through the building and push down the first cart, then drop to the area with the switches. You need to pull these switches to temporarily raise platforms in the water to progress. First use the BLUE and the ORANGE to get across to the other building, where there will be all three colors of switches. In here you want to quickly pull them in the order GREEN, BLUE, ORANGE, then pull the ORANGE switch you run by as you quickly get to the end.

The next part is a long section of the submergible walkways. First get to the middle platform as Moreau will flop down on all of them, then when he leaves quickly run to the end before he drops them again.

Follow the path where you will push down a cart to get back to the central building, which now has a second cart to push down allowing you to progress. Pull the switch to lift a boat out of the water, then go through the middle and quickly break the goo that appears to get out of the boat before Moreau destroys it. Drop the ladder so you can climb it, and you will now be on top of another windmill. Interact with the to obtain it.

You first need to go around and interact with the ladder section on the ground, then you can go back to the gears and use the to stop the windmill. Climb up to the top and use the zipline to get back to the first windmill, then use the on it to get power running in the pumphouse. Go inside and interact with the console, then complete the light puzzle to get the switch working (the solution on the side is rotated to the right).

Use the switch to drain the water, then go out the door to the right and follow Moreau into the next area.
Sturm
In the next area, you need to defeat Sturm do continue. This fight takes place in a (starting out) small set of hallways that get knocked down and the area expanded as Sturm charges around. At the start of the fight, it will only charge a single time then get stuck, where you can then attack the small red turbine on its back to deal damage.
After some damage is done the body of the engine on its head will glow red, and it will start doing either three charges in a row or shooting large jets of fire at you. When it’s charging you want to wait for the third one before you try and damage it, because it does the three in quick succession and gets stuck for a bit after the third. When it’s shooting fire at you it will track where you are until the fire actually starts then stay still. If you are able to get close to it you can use this to your advantage by moving behind it when it’s shooting fire and damaging the turbine.
After enough damage is dealt it will explode and you can leave out the nearby door. Climb out onto the boom arm and interact with the switch to raise yourself up to the next area. Continue through the doors, where you will be knocked to the bottom of the factory. Follow the path through for some more cutscenes, then interact with the vehicle to proceed.
Общая могила и Сад
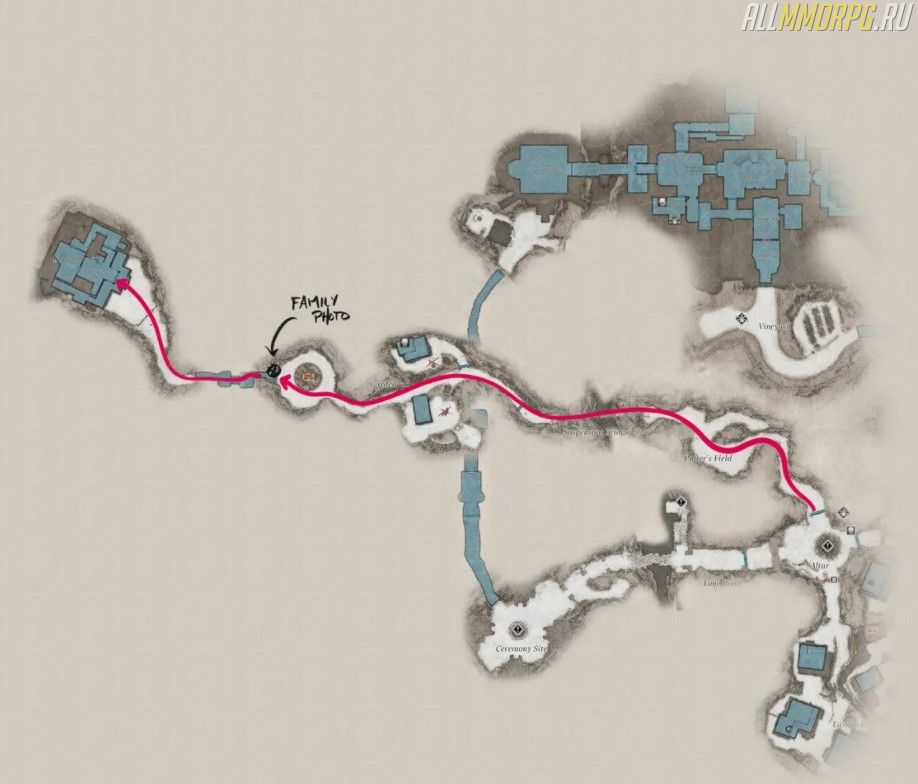
Дойдите до общей могилы и продолжайте двигаться вперед через подвесной мост. По дороге нет никаких предметов, которые можно собрать.
В конце пути вы попадете на круглую площадку со странной могилой по центру. Идите к двери. Справа от дверей будет табличка, на которой написано:
«Отдай свои воспоминания».
Это подсказка. Вам нужно вложить в отверстие фотографию Мии с Розой. Войдите внутрь, доберитесь до лифта и поднимитесь наверх. Потом идите по дороге к дому Беневиенто.
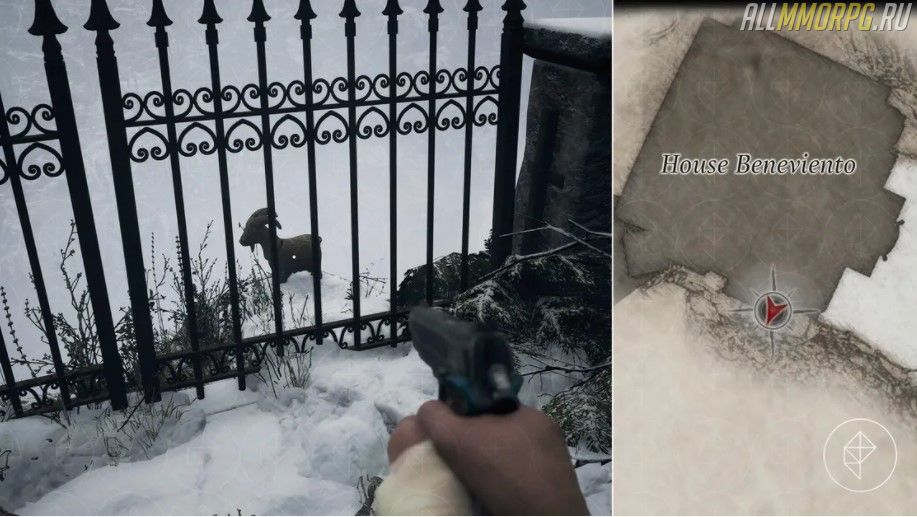
Прежде чем войти в дом, поверните налево от парадной двери. Спустившись с лестницы, вы найдете козий оберег за решетчатой оградой.
Urias Strajer
You now have another boss fight with Urias Strajer. As the name would imply this one is similar to the one you fought as Ethan, but much stronger and with armor on its face which means that is off the table for damage. Its back is exposed and shooting it there does deal more damage, but it generally doesn’t leave it exposed for very long. After a while you will start being able to call in airstrikes on it, which is the best way to kill it quickly. Avoid its attacks in the same way you did against the one as Ethan and call in airstrikes when you can.
After it’s dead. take the newly opened path. After a cutscene continue down the path until you reach a lab, then interact with the door at the back.
After more scenes you will be back playing as Ethan. When you are back in the central village area grab any supplies you need, then follow the path to the “Ritual Site”.
Resident Evil Village Trivia, Lore, And Opinions
This is where you’ll find all of our views on Resident Evil 8 Village, in addition to a bunch of information on the characters and world of Resident Evil that you might not know. Whether or not you’ve finished the game, you’ll find plenty of extra information here to supplement your Resident Evil Village experience.
- Resident Evil Village Review: A Bold Homage To The 2005 Classic
- Resident Evil Village Is Scariest When Nothing Is Happening
- Resident Evil’s Greatest Strength Is Its Brevity
- Resident Evil Village Has An Accessibility Problem
- Resident Evil’s Dead By Daylight Chapter Has A Massive Roster Of Potential
- Resident Evil Village Is Unintentionally The Funniest Game Of The Year
- You Can Actually Still Have Fun Playing Resident Evil Village If You’re A Total Coward
- Resident Evil Village’s Design Is Stuck In The Past
- 10 Things Only Pro Players Know You Can Do
- 10 Things That Make No Sense
- 10 Hidden Areas Everyone Completely Missed
Next: Resident Evil Village Review: A Bold Homage To The 2005 Classic
Arcane Is Gayer Than I Ever Expected It To Be
Vi and Caitlyn’s romance becomes official in Arcane’s final act — and it’s adorable.
Read Next
About The Author
Dave Aubrey
(678 Articles Published)
TheGamer Guides Editor.
Am I supposed to write this in the third-person? Do you know how awkward it is talking about yourself like you’re someone else? No one would ever believe someone else has this many nice things to say about me.
More
From Dave Aubrey
Бой с Сальваторе Моро: советы и стратегия
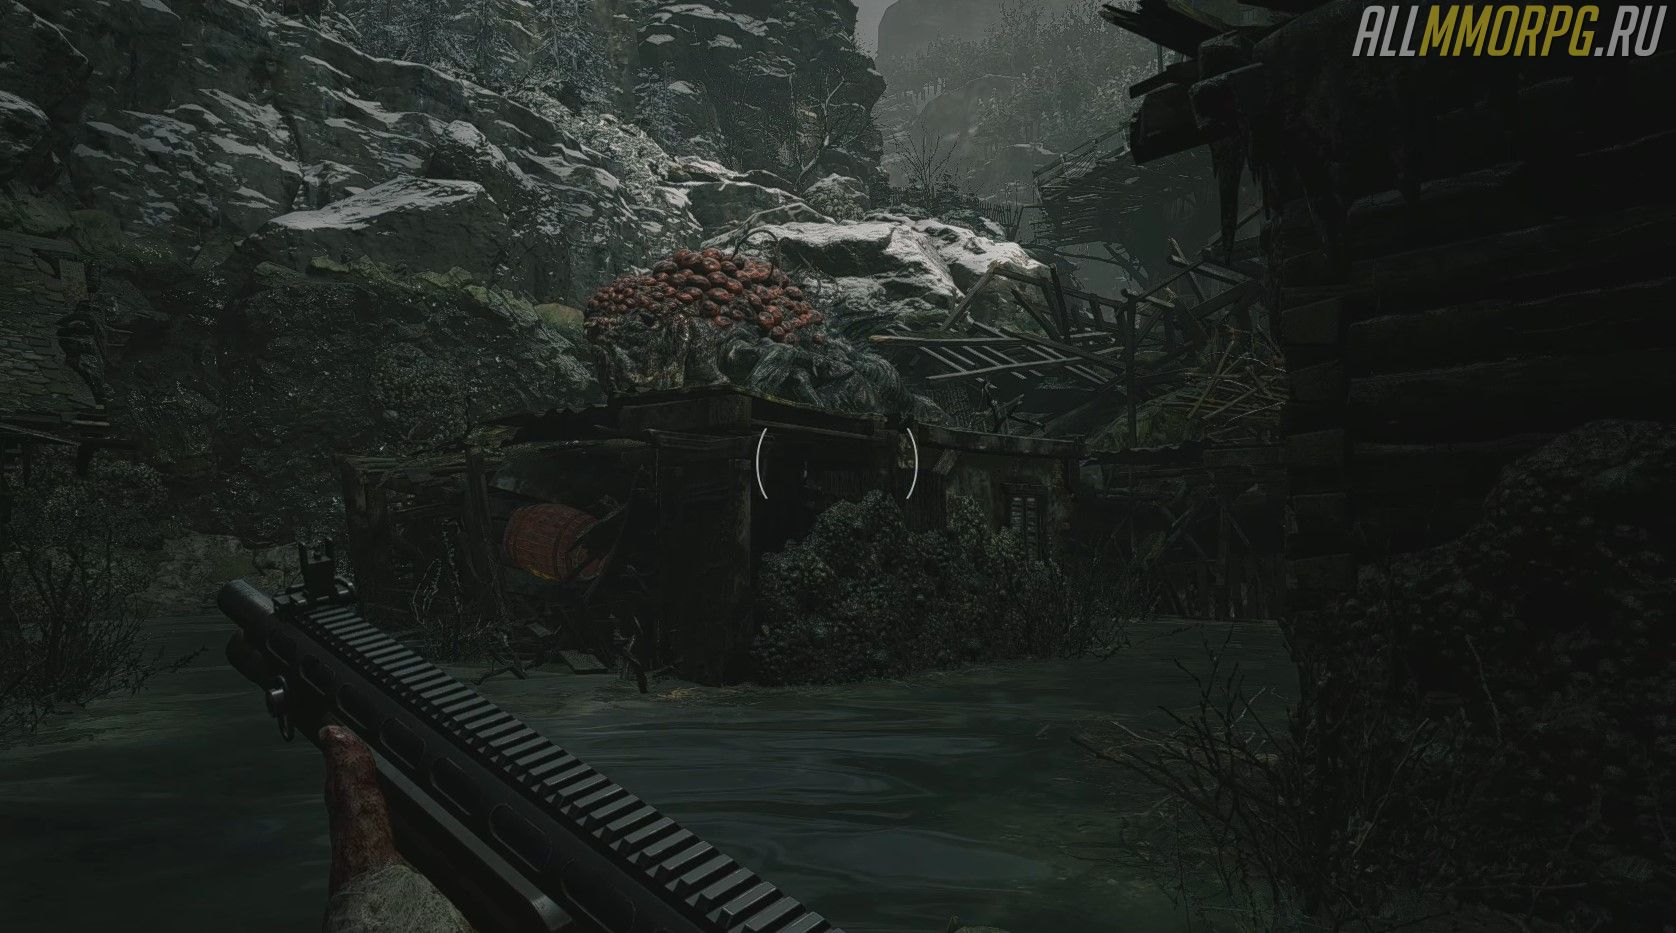
После того, как Итан спустил воду в резервуаре, Моро больше некуда деваться. Он в ловушке и будет биться до последнего вздоха. Покидайте комнату управления шлюзом и идите мимо ветряной мельнице до площадки с боссом. Но будьте осторожны, как только вы спрыгните вниз, пути назад не будет. Так что до встречи с мутировавшим Моро осмотрите ранее пройденные зоны болота и соберите все ценности и ресурсы, которые пропустили.
Спрыгнув вниз, идите направо к желтой трубе. Возле нее за углом есть бочки с припасами. Вы успеете забрать их до начала сражения. Подобрав полезные предметы, двигайтесь дальше вдоль стены.
Гайд по боссу Моро: фаза 1
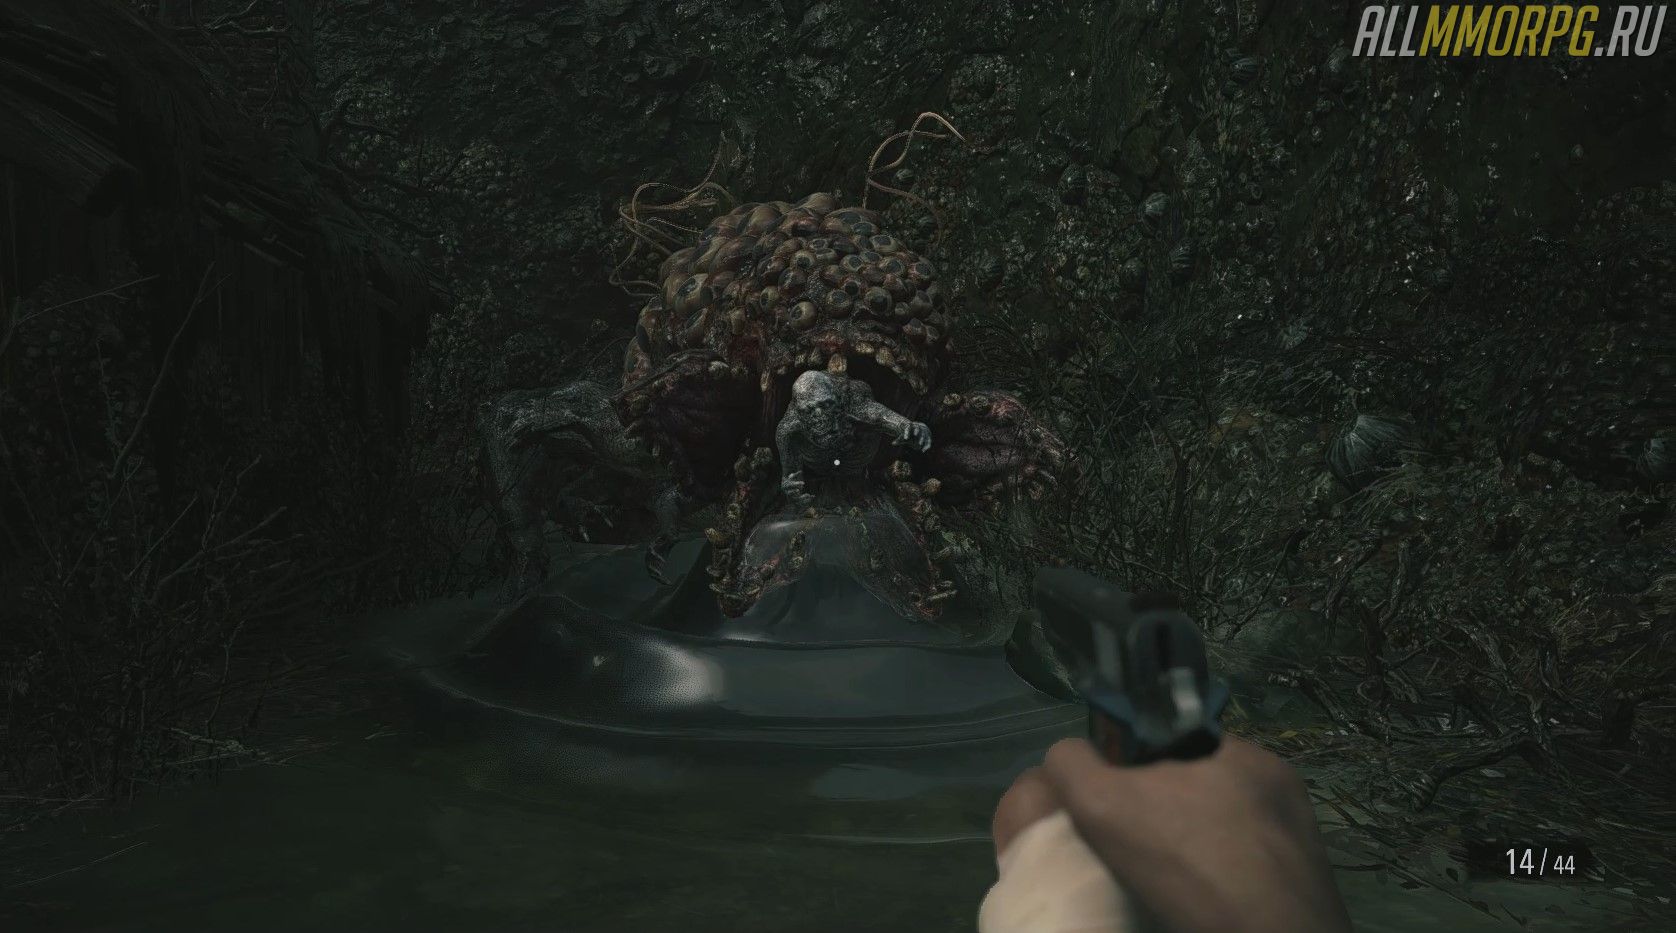
Пройдя некоторое расстояние, вы столкнетесь с мутировавшим Моро. Он выпрыгнет на вас слева, разрушив деревянную постройку, и начнет плеваться зеленой жижей. Если в этот момент Итан будет находиться слишком близко к морде босса, он получит большой физический урон.
С самого начала боя нужно держаться от монстра подальше. Постоянно двигайтесь и стреляйте по его слабому месту. Оно, как и у леди Димитреску, похоже на человекоподобный отросток. Единственное отличие – у Моро этот отросток находится не на спине, а во рту.
Как только босс перестанет изрыгать яд, его пасть откроется и из нее покажется нечто, похожее на тело человека. Самый лучший вариант – стрелять в него из ружья. Но помните: близко подходить нельзя. Для начала вам будет достаточно несколько метких попаданий.
Получив достаточно урона, мутировавший Моро начнет корчится от боли. На этом моменте у вас есть шанс принять удобную позицию и выстрелить еще по его уязвимому месту.
После этого босс отползет от главного героя и начнет готовиться к сильной атаке (перед этим его тело начнет краснеть).
Гайд по боссу Моро: фаза 2
Босс использует особую атаку, когда заберется на крышу здания. Он задерет голову и начнет изрыгать ядовитую слизь, которая дождем покроет всю площадку. При попадании на тело главного героя капли яда нанесут большой урон. Чтобы не умереть, вам нужно найти любое укрытие. К счастью, таких мест на площадке предостаточно.
Увидев, что босс готовится применять сильную способность, бегите под любой навес. Под ним обычно располагаются ящики с припасами, помеченные желтым цветом. Соберите патроны, мины и т. д. и переждите, пока Моро не прекратит плеваться слизью.
Как только босс снова окажется на земле, пора сконцентрировать свое внимание на взрывных бочках (оранжевые). Моро хоть и огромен, но весьма медлителен
Заманивайте его к взрывным бочкам, после чего стреляйте по ним. Взрыв нанесет боссу огромный урон.
На площадке вы найдете много бочек. Просто водите монстра между ветхими строениями и взрывайте их. Однако не теряйте бдительности. Периодически Моро будет создавать стены из слизи. Чтобы убежать от монстра, вовремя разбивайте их ножом или выстрелами из оружия, если у вас достаточно патронов.
По мере того, как вы будете наносить ему все больше и больше урона, босс снова впадет в ярость. Он еще раз запрыгнет на крышу и начнет изрыгать яд, который обжигает кожу главного героя. Вам нужно вовремя сориентироваться и занять правильную позицию. Если вы не добежите до навеса – с большой вероятностью умрете. Умрете, если уже потратили все лекарства.
После этой атаки вы можете добить босса, стреляя по его уязвимому месту. Потом подберите предмет «Кристаллический Моро» и исследуйте площадку. Возможно, вы пропустили припасы, которых там много.
Lady Dimitrescu
After interacting with the coffin you will start the boss fight against Lady Dimitrescu. She has mutated into a giant dragon-like creature, and you are fighting her on a tower. The basic idea for the fight is to shoot her still “normal” torso part on the back of the dragon to do the most damage. Keep backing up for this first section, avoiding lunges from the dragon. If you are doing this knife only, the basic idea is just to get behind her and keep hitting the back leg of the dragon, because it can’t do anything when you’re behind it until it turns around. If she flies away and hovers in the outside of the area, you can shoot her body to stagger her, causing her to drop onto the tower for a short period where you can get in more damage.
When she days the dialogue line “More blood” the fight will progress to the second part, where you are put on a stairwell higher up the tower. Don’t try to damage her right now, just make your way up to the top floor of the tower. She will fly around outside the tower, then drop into the middle with you, where you just need to keep putting damage into her until she dies.
When the fight is over, go to the altar at the front of the room and pick up the to leave the area.