Recipes
Содержание:
- What are templates?[]
- Generating a new world[]
- Crystallizer Recipes[]
- Biomes
- Screenshots:
- Reaching The Dreadlands[]
- Summoning Asorah, The Fallen[]
- Mobs
- Transmutator Recipes[]
- Omothol[]
- Dimensions
- General wiki templates[]
- Summoning Asorah, The Fallen[]
- The Abyssal Wasteland[]
- Abyssal Strongholds[]
- Information[]
- Defeating Cha’garoth[]
- Rituals
- The Dreadlands[]
What are templates?[]
Wiki templates provide a means to insert the same content over and over in different (or the same) pages. This saves editors the hassle of duplicating the same text again and again, and also helps ensure consistency.
Templates are generally shown with the format required to use the template (e.g. ). Clicking the template name takes you to the template’s page, where you can see what it looks like and how it is used.
Detailed instructions on the usage of each template should exist on:
- a subpage using {{documentation}}; or
- the template page itself (inside «noinclude» tags); or
- the template’s talk page.
For more information on templates, see Help:Templates.
Generating a new world[]
The first thing you should do after installing AbyssalCraft (as of version 1.8.4 and later) is to craft a Necronomicon. This picture shows how a Necronomicon is crafted:
This book contains the majority of the information written on this wiki page, with some extra info on materials found in the various dimensions added by the mod (and new materials found in the Overworld).
As you might suspect, AbyssalCraft adds a new overworld biome when you generate a new world with it, the biome (called «The Darklands») is made out of Darklands grass, which is a purple/indigo grass that emits nether portal particles, and other things you can easily notice inside it is the trees (leaves have a similar color to the grass) and the various generated structure scattered around the place (as of lately, the structures are quite rare). A good start when you find a Darklands biome is to locate the 2 story high buildings that looks like a wizard tower, for the simple reason that it contains a fully powered enchantment table, allowing you to quickly enchant tools/armor as you obtain them.
Crystallizer Recipes[]
Note: Not all elements return 2 outputs.
- Liquid Coralium -> 2 Crystallized Coralium
- Liquid Coralium Bucket -> 2 Crystallized Coralium
- Refined Coralium Ingot -> 1 Crystallized Coralium
- Chunk of Coralium -> 1 Crystallized Coralium
- Liquified Coralium Ore -> 1 Crystallized Coralium
- Abyssalnite Ingot -> 1 Crystallized Abyssalnite
- Chunk of Abyssalnite -> 1 Crystallized Abyssalnite
- Dreadium Ingot -> 1 Crystallized Dreadium
- Sulfur -> 1 Crystallized Sulfur
- Iron Ingot -> 1 Crystallized Iron
- Gold Ingot -> 1 Crystallized Gold
- Redstone -> 1 Crystallized Redstone
- Coal -> 1 Crystallized Carbon
- Blaze Powder -> 1 Crystallized Blaze
- Bone Meal -> 1 Crystallized Phosphorus
- (O) Abyssalnite Ore/Dreadlands Abyssalnite Ore -> 1 Crystallized Abyssalnite
- (O) Coralium Ore/Abyssal Coralium Ore -> 1 Crystallized Coralium
- (O) Iron Ore/Abyssal Iron Ore -> 1 Crystallized Iron
- (O) Gold Ore/Abyssal Gold Ore -> 1 Crystallized Gold
- (O) Tin Ingot -> 1 Crystallized Tin
- (O) Abyssal Tin Ore -> 1 Crystallized Tin
- (O) Copper Ingot -> 1 Crystallized Copper
- (O) Abyssal Copper Ore -> 1 Crystallized Copper Ore
- (O, I) Aluminium Ingot -> 1 Crystallized Aluminium
- (O, I) Aluminium Ore -> 1 Crystallized Aluminium
- (O, I) Block of Copper -> 9 Crystallized Copper
- (O, I) Block of Tin -> 9 Crystallized Tin
- Block of Gold -> 9 Crystallized Gold
- Block of Iron -> 9 Crystallized Iron
- Block of Abyssalnite -> 9 Crystallized Abyssalnite
- Block of Refined Coralium -> 9 Crystallized Coralium
- Block of Dreadium -> 9 Crystallized Dreadium
- Coal Ore -> 1 Crystallized Carbon
- Block of Coal -> 9 Crystallized Carbon
- Redstone Ore -> 1 Crystallized Redstone
- Block of Redstone -> 9 Crystallized Redstone
- (O, I) Zinc Ingot -> 1 Crystallized Zinc
- (O, I) Zinc Ore -> 1 Crystallized Zinc
- Dreaded Chunk of Abyssalnite -> 1 Crystallized Abyssalnite + 1 Crystallized Dreadium
- Dreaded Abyssalnite Ore -> 1 Crystallized Abyssalnite + 1 Crystallized Dreadium
- Water -> 4 Crystallized Hydrogen + 2 Crystallized Oxygen
- -> 4 Crystallized Hydrogen + 2 Crystallized Oxygen
- -> 2 Crystallized Hydrogen + 1 Crystallized Oxygen
- Lapis Lazuli -> 6 Crystallized Silica + 4 Crystallized Sulfur
- Methane -> 1 Crystallized Carbon + 4 Crystallized Hydrogen
- Gunpowder -> 4 Crystallized Nitrate + 1 Crystallized Sulfur
- (O) Nitre (Saltpeter) -> 1 Crystallized Potassium + 1 Crystallized Nitrate
- (O) Nitre Ore (Saltpeter Ore) -> 1 Crystallized Potassium + 1 Crystallized Nitrate
- Obisidian -> 1 Crystallized Silica + 1 Crystallized Magnesia
- Stone -> 1 Crystallized Silica + 1 Crystallized Alumina
- Crystallized Silica -> 1 Crystallized Silicon + 2 Crystallized Oxygen
- Crystallized Alumina -> 2 Crystallized Aluminium + 3 Crystallized Oxygen
- Crystallized Magnesia -> 1 Crystallized Magnesium + 1 Crystallized Oxygen
- (O, I) Bronze Ingot -> 1 Crystallized Copper + 3 Crystallized Tin
- Crystallized Methane -> 1 Crystallized Carbon + 4 Crystallized Hydrogen
- Crystallized Nitrate -> 1 Crystallized Nitrogen + 3 Crystallized Oxygen
- Lapis Lazuli Ore -> 6 Crystallized Silica + 4 Crystallized Sulfur
- Lapis Lazuli Block -> 54 Crystallized Silica + 36 Crystallized Sulfur
- (O, I) Brass Ingot -> 3 Crystallized Copper + 2 Crystallized Zinc
- (O, I) Brass Ore -> 3 Crystallized Copper + 2 Crystallized Zinc
- Rotten Flesh -> 2 Crystallized Phosphorus
- (O, I) Iron Dust -> 1 Crystallized Iron
- (O, I) Gold Dust -> 1 Crystallized Gold
- (O, I) Tin Dust -> 1 Crystallized Tin
- (O, I) Copper Dust -> 1 Crystallized Copper
- (O, I) Coal Dust -> 1 Crystallized Carbon
- (O, I) Aluminium Dust -> 1 Crystallized Aluminium
- (O, I) Bronze Dust -> 1 Crystallized Copper + 3 Crystallized Tin
- (O, I) Brass Dust -> 3 Crystallized Copper + 2 Crystallized Zinc
Biomes
AbyssalCraft introduces various biomes to the Overworld.
Darklands
Darklands is a biome with purple grass and Darklands Oak Trees. Darkstone and Abyssalnite are found under the Darklands. This is the only biome in the overworld where Abyssalnite spawns underground.
There are 4 variants of the Darklands biome: Darklands Plains, Darklands Forest, Darklands Mountains and Darklands Highland. The Darklands Plains have less trees and is flatter, the Darklands Forest have a lot more trees, the Darklands Mountains consists of Darkstone mountains, and the Darklands Highland have elevated terrain and less trees. Depths Ghoul and Abyssal Zombie spawns in all variants of the Darklands.
Staying for a prolonged amount of time will inflict temporary blindness on the player; this can be changed in the mod’s configuration file.
Coralium Infested Swamp
The Coralium Infested Swamp is a biome with teal grass and many Liquid Coralium pools. Vanilla Minecraft trees are found here, but with turquoise leaves. Liquid Antimatter pools spawn under this biome. Depths Ghoul and Abyssal Zombie spawns in the Coralium Infested Swamp.
Screenshots:
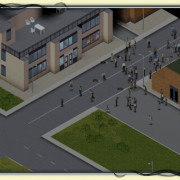
Coralium Infested Swamp – A Coralium Infested Swamp biome

The Darklands – A normal Darklands biome

Darklands Plains – A Darklands Plains biome

Darklands Forest – A Darklands Forest biome

Darklands Highlands – A Darklands Highlands biome

All items in the mod as of version 1.9.5.1

Liquid Coralium and Liquid Antimatter, two fluids added in the mod

Buttons and Pressure Plates made from various materials.

Portals leading to the various dimensions added in the mod. Worth noting only the green one is built in the Overworld.

All ordinary blocks in the mod as of version 1.9.5.1.

You can make doors out of the two wood types.

Storage, machines, heads, explosives and some out-of-the-ordinary blocks

Statues depicting Lovecraftian deities and other blocks used in the mods energy system

A setup of pedestals and an altar used in the mods magic system to perform various rituals.

A Darklands Mountain biome

The first dimension

The second dimension. Also the color palette of torture

The third dimension

The fourth dimension

Probably the most hated mob in all of modded Minecraft.

Translucent, smoking, hard to see in dark places. Inhabitants of the Darklands and the Dark Realm.

All purpose undead. Probably carry all sorts of diseases…

Skeleton Goliath – Undead, big, has a club.

Dread Spawns

Armored foe that can barf all sorts of nasty stuff on you.

Inhabitants of Omothol. Has a thing for trading.

Reaching The Dreadlands[]
In order to reach the Dreadlands, the player must have killed Asorah, located an Abyssal Stronghold, and have a gateway key, and be in the possession of a transmutation gem. Asorah’s Dreaded Gateway Key is crafted by placing the gateway key in the center of the crafting grid, with the other 3 components around it (1 located on top of it, the other 2 on the sides in the grid). The key is used like it’s former counterpart. Right-click on the ground and a portal will be created.
One thing you should do before heading to the Dreadlands is to create a Transmutator, as it will be very useful later when it comes to experimenting with crystals produced by the Crystallizer. In order to craft it, you need 2 Refined Coralium Blocks, 1 Liquid Coralium Bucket, 1 Transmutation Gem and 5 Coralium Bricks. In order to obtain the Coralium Bricks, you need to pour Liquid Antimatter on Liquid Coralium, creating Coralium Stone. Liquid Antimatter can be found in the Coralium Infested Swamp biome, but can also be crafted if you can’t find the biome (using 1 lava bucket, 1 water bucket, 1 milk bucket and 1 liquid coralium bucket, with 5 iron ingots placed as a boat with the buckets on top of it in the crafting grid).
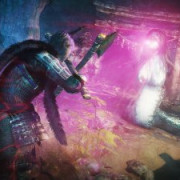
Summoning Asorah, The Fallen[]
Once the player obtains the components to craft an Altar, the first boss of AbyssalCraft, Asorah, The Fallen, may be summoned. In order to summon the boss, the Altar must be built in the wastelands using abyssal cobblestone. Assembling the altar requires a shift-right click to the center block with the second tier (abyssal wastelands) Necronomicon. Once built, Asorah can be summoned by the player performing the Ritual of the Sleeper (details in the Necronomicon).
Fighting Asorah can be tricky. During the fight,Spectral Dragons will spawn around him, allowing him to drain their life to heal his own, killing them in the process. It’s worth noting that when a Spectral Dragon dies, they explode, dealing direct damage to Asorah. When Asorah reaches half health, he will start to slowly lose health when a spectral dragon is nearby. When he reaches 25% health, however, he will once again continue to drain the life out of the dragons.
Once defeated, Asorah will drop a large amount of experience as well as the «Eye of The Abyss».
Mobs
AbyssalCraft introduces 40 regular mobs and 4 bosses to Minecraft.
Hostile Mobs
Some of the hostile mobs of AbyssalCraft are listed below:
- Depths Ghoul, a mob that spawns in the Darklands and the Abyss dimensions and have zombie-like behavior.
- Abyssal Zombie, a zombie variant that spawns in the Darklands, the End and the Abyss dimensions. Can infect other zombies to become Abyssal Zombies.
- Evil Pig, a pig-looking mob that is hostile. Turns into Demon Pig when killed.
- Demon Pig, another pig-looking hostile mob. Spawns in the Nether and the Dreadlands, or when an Evil Pig dies. It Is resistant to fire.
- Dreaded Abyssalnite Golem, a mob that spawns in the Dreadlands and attacks nearby players and Abyssalnite Golems.
- Shadow Creature, the smallest of the 3 types of Shadow beings. All Shadow beings are covered in smoke and try to avoid sunlight. They spawn in the Darklands Mountains biome and The Dark Realm. They become invisible when it is dark enough.
- Shadow Monster, the medium-sized mob out of the Shadow beings.
- Dread Spawn, a mob that spawns in the Dreadlands Forest biome in large packs and is very slow.
- Dreadling, a mob that spawns in the Dreadlands and usually crawls around in the Dreadlands Mountains biome.
- Spawn of Cha’garoth, a mob that is only spawned by Cha’garoth and is a more powerful version of the Dread Spawn.
- Dark Offspring, a mob resembling a goat mixed with a dead tree, often spawns in the forest at night.
Neutral Mobs
Some of the neutral mobs of AbyssalCraft are listed below:
- Abyssalnite Golem, a mob that spawns in the Dreadlands and is hostile to Dreaded Abyssalnite Golem. If the player attacks one Abyssalnite Golem, all Abyssalnite Golems nearby become hostile to the player.
- Remnant, a mob that spawns in Omothol. A player with an Omothol Necronomicon or Abyssalnomicon can trade with it. If the player attacks one Remnant, all Remnants nearby become hostile to the player.
Elite Mobs
Elite mobs are hostile mobs that are tricky to kill. Some of the elite mobs of AbyssalCraft are listed below:
- Dreadguard, a large and powerful mob known to guard Cha’garoth’s lair.
- Spectral Dragon, a mob that spawns in the Abyssal Wasteland and behaves similarly to the Ender Dragon. It is able to phase through most materials and heals Asorah.
- Shadow Beast, the largest and strongest mob out of the Shadow Beings,
- Skeleton Goliath, a tall skeleton with a Cudgel as it’s weapon. The Skeleton Goliath spawns in the Abyssal Wasteland.
- Fist of Cha’garoth, a mob that is only spawned by Cha’garoth.
Boss Mobs
Boss mobs are the most powerful mobs in Abyssalcraft. They are listed below:
- Asorah, The Fallen, the first boss in AbyssalCraft. It spawns Spectral Dragons to heal itself. This boss is summoned in the Abyssal Wastelands.
- Cha’garoth, The Dreadbeast, the second boss in AbyssalCraft. It spawns Spawn of Cha’garoth and Fist of Cha’garoth to help itself. This boss is summoned in the Dreadlands.
- J’zahar, Gatekeeper of the Abyss, the third boss in AbyssalCraft. When J’zahar is killed, it will create a big explosion. This boss is summoned in Omothol.
- Sacthoth, Harbinger of Doom, an optional boss in AbyssalCraft. It spawns all types of Shadow beings. This boss is usually summoned in the Dark Realm, but can be summoned in other dimensions.
Anti-Mobs
When a mob or the player gets killed by Liquid Antimatter, which deals 5 points of damage every half-second upon contact, an anti version of the killed mob is generated. Anti-mobs are stronger than its normal variant, and will explode when touching the normal version of the mob.
Transmutator Recipes[]
Note: Gaseous elements would normally turn into gas if they were de-crystallized, but here nothing happens to the crystal. Then there’s the fact that this type of crystallization is fictional.
- Crystallized Abyssalnite -> 1 Abyssalnite Ingot
- Crystallized Coralium -> 1 Refined Coralium Ingot
- Crystallized Dreadium -> 1 Dreadium Ingot
- Dreaded Shard of Abyssalnite -> Dreadium Ingot
- Crystallized Iron -> 1 Iron Ingot
- Crystallized Gold -> 1 Gold Ingot
- Crystallized Sulfur -> 1 Sulfur
- Crystallized Blaze -> 1 Blaze Powder
- Crystallized Redstone -> 1 Redstone
- Crystallized Hydrogen -> 1 Crystallized Hydrogen
- Crystallized Oxygen -> 1 Crystallized Oxygen
- Crystallized Nitrogen -> 1 Crystallized Nitrogen
- Crystallized Methane -> 1 Methane
- Crystallized Tin -> 1 Tin Ingot
- Crystallized Copper -> 1 Copper Ingot
- Darkstone -> 1 Stone
- Stone -> 1 Darkstone
- Stone Brick -> 1 Darkstone Brick
- Darkstone Brick -> 1 Stone Brick
- Cobblestone -> 1 Darkstone Cobblestone
- Darkstone Cobblestone -> 1 Cobbelstone
- Coralium Stone Brick -> 4 Coralium Brick
- Coralium Brick -> 1 Coralium Stone
- Liquid Coralium Bucket -> 1 Liquid Coralium
- Liquid Coralium -> 8 Coralium Stone
- Liquid Antimatter Bucket -> 1 Liquid Antimatter
- Diamond -> 64 Coal
- -> 1 Water
- -> 1 Lava
- Wool -> 9 String
- Gravel -> 2 Flint
- Quartz Block -> 4 Nether Quartz
- Nether Brick -> 4 Nether Brick (item)
- Nether Brick (item) -> 1 Netherrack
- Water -> 8 Ice
- Wheat -> 1 Seed
- Seed -> 1 Wheat
- Dense Carbon Cluster -> 1 Diamond
- Dreaded Gateway Key -> 1 Cha’garoth’s R’lyehian Gateway Key
- Crystallized Aluminium -> (O, I) 1 Aluminium Ingot
- Crystallized Zinc -> (O, I) 1 Zinc Ingot
- Lava -> 8 Solid Lava
- End Stone -> 1 Ethaxium
- Ethaxium -> 1 End Stone
- Ethaxium Brick (block) -> 1 Ethaxium
Omothol[]
A endless temple city built at the very edge of sanity. The Realm of J’zahar holds the only entrance to where The Great Old Ones dwell. The Gatekeeper is always watching, and nobody leaves the final layer of the Abyss alive.
Materials
| Omothol Stone is a new type of stone that Omothol is made out of. It can be combined with Ethaxium to create Dark Ethaxium. | ||
| Ethaxium is a new material most commonly appearing in Omothol as the material used for structures built there. Ethaxium is extremely hard, and can thus only be destroyed with tools made from it. | Ethaxium is said to be what souls are made out of, which likely explains why it’s almost indestructible. No wonder J’zahar built his temple city from this. | |
| Dark Ethaxium is a stronger version of Ethaxium created by combining regular Ethaxium with Omothol Stone. This kind of Ethaxium is harder than it’s normal counterpart. | This material is only used in one structure, the Temple of J’zahar. |
Progression
Now that you’ve arrived in Omothol, it’s time to battle J’zahar, Gatekeeper of The Abyss. This Dimension is currently incomplete, so there isn’t that much to do here apart from getting materials to craft the Abyssalnomicon.
This section will be updated when Omothol has been completed. At that point, there will be a gigantic city built upon these floating islands.
Entities
| Remnants are the citizens of Omothol, found there. | Since all Great Old Ones has some type of offspring, J’zahar has the Remnants, whom are lesser beings of himself, incapable of obtaining the power he bears. Instead they worship him like his loyal breed, and trade goods with other life forms. | |
| Omothol ghouls are the final evolution, found in Omothol. | The Omothol Ghoul is the final evolution of the Depths Ghoul, unlocking the full potential of death. Aeons in darkness has made these behemoths immune to fire, while strengthening them greatly. | |
| Omothol Wardens are demons found in Omothol. | Omothol Wardens are demons tasked by J’zahar to patrol Omothol, searching for intruders to eliminate. These demonic beings are powerful guardians of the Abyss. | |
| Minions of The Gatekeeper are loyal servants to J’zahar found in Omothol. | Minions of The Gatekeeper are an elite of more powerful Remnants serving their master. They are commonly found around The Temple of J’zahar, being loyal minions to the Gatekeeper. | |
| J’zahar, Gatekeeper of The Abyss, is the final boss in AbyssalCraft, found in Omothol. | J’zahar was the only one among The Great Old Ones to not get banished to the eternal void. Due to the powers he obtained when he reverted time and space to re-create it, he is tasked with guarding his fellow demonic gods in their eternal slumber. | |
| Lesser Shoggoths are a smaller breed of Shoggoths found throughout the Abyss. | Shoggoths are amorphous shapeshifting beings genetically engineered by the Elder Things as a race of servant-tools. Though being mindless, they became conscious and killed their masteers. Now they sometimes build monoliths in honor of The Great old Ones. |
Dimensions
The 4 dimensions of AbyssalCraft are collectively known as The Abyss and are: The Abyssal Wastelands, the Dreadlands, Omothol and The Dark Realm.
The Abyss dimensions (excluding The Dark Realm) are accessed by Gateway Keys, which place down a portal when used. To exit the Abyss, the player will have to walk through a corresponding portal in the Abyss dimensions.
Compasses and Clocks do not work at all in the Abyss dimensions. The Abyss dimensions also do not have a day-night cycle system.
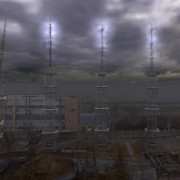
The Abyssal Wasteland
The Abyssal Wasteland is the first Abyss dimension that the player will encounter. This dimension has a bright green sky and a dark ground. The mobs Death Ghoul, Abyssal Zombie, Zombie, Skeleton, Spectral Dragon and Skeleton Goliath spawn here.
The Abyssal Wastelands spawns abyssal versions of Overworld ores. These ores spawn at the same Y-level as their corresponding Overworld ore.
Pools of Liquid Coralium generate here. The terrain is slightly mountainous plains with dark green grass. The first boss of AbyssalCraft, Asorah, The Fallen can be spawned here.
The Dreadlands
The Dreadlands is the second Abyss dimension. This dimension has a red, Nether-like sky and maroon Dreadlands Grass on the ground. The Dreaded Abyssalnite Golem, Abyssalnite Golem, Dreadling, Dread Spawn and Dreadguard are the mobs that are found in The Dreadlands.
The ores Dreaded Abyssalnite and Dreadlands Abyssalnite are found in this dimension.
The Dreadlands contain different biomes such as the Dreadlands Mountains, Purified Dreadlands and Dreadlands Forest. Dreadlands Trees are commonly seen here. The second boss, Cha’garoth, The Dreadbeast can be spawned here.
Omothol
Omothol is the third Abyss dimension. This dimension has a completely black sky and the ground is filled with dark gray colored Omothol Stone. Remnants, Omothol Ghouls, Omothol Wardens and the Minions of the Gatekeeper are the mobs that populate Omothol.
Ethaxium Ore are found in Omothol.
The terrain here is generated on sky islands, and falling into the bottom void is very easy. The terrain consists of barren mountains and plains that is nearly completely made out of Omothol Stone. The third boss, J’hazar, Gatekeeper of the Abyss can be spawned here.
The Dark Realm
The Dark Realm is the fourth and final Abyss dimension. Unlike the other Abyss dimensions, The Dark Realm is accessed by jumping off the edge of an island in Omothol. Fall damage occurs when a player enters The Dark Realm. The player can exit The Dark Realm by using a Cha’garoth’s R’lyehian Gateway Key to make a portal to Omothol.
Shadow Creature, Shadow Monster, Shadow Beast and Lesser Shoggoth populate The Dark Realm. The terrain here is completely made of dark violet colored Darkstone. The optional boss, Sacthoth, Harbinger of Doom is spawned rarely in this dimension.
General wiki templates[]
Clear
{{clr}}, plus {{clrl}} and {{clrr}}
- This template is used to reduce the amount of non-wikicode used on pages, replacing the code . Its use should generally be avoided.
- You can use {{clr}} instead of the HTML tag that clears space below things like images, pictures and tables, so the following stuff doesn’t begin until the bottom of the image, picture or table box.
- You can also use {{clrl}} or {{clrr}} to clear only left or right floats.
{{for|<name>|<link>}}
Use at the top of articles as a simple «for x see y» template.
{{main|<main article>}}
Use at the start of a section to link to the main article on it.
Right-aligned Table of Contents
{{tocright}}
This template floats the table of contents (toc) on the right. It should only be used when absolutely necessary, to keep consistent design.
{{sandbox}}
A template that should be used to head up all Project:Sandbox pages.
{{t|<template>}}
This template allows you to show example template code (with a link to the templates) without using the template itself. It is used extensively on this page.
Welcome
{{welcIP}} and {{welcome}}
- The first (with longer version «welcomeIP» for those of you who like typing more) is to welcome new non-vandalistic contributors who are «anonymous», identified only by their IP number; it encourages them to register.
- The second template is for welcoming new registered users. Should be customized for the wiki, indicating the pages we most want newcomers to visit.
- The above two templates are very suitable for having «subst:» prefixed, because they can be edited with additions or deletions appropriate to the apparent strengths of the person being welcomed; e.g. if the contributor has already demonstrated good wiki editing skills you could delete references to pages about «how to edit».
Wikipedia
{{wikipedia}}, {{wikipedia-deleted}}
Wikipedia-related templates. Use {{wikipedia}} for articles taken directly from Wikipedia, and {{wikipedia-deleted}} for articles deleted from Wikipedia.
Summoning Asorah, The Fallen[]
Once the player obtains the components to craft an Altar, the first boss of AbyssalCraft, Asorah, The Fallen, may be summoned. In order to summon the boss, the Altar must be built in the wastelands using abyssal cobblestone. Assembling the altar requires a shift-right click to the center block with the second tier (abyssal wastelands) Necronomicon. Once built, Asorah can be summoned by the player performing the Ritual of the Sleeper (details in the Necronomicon).
Fighting Asorah can be tricky. During the fight,Spectral Dragons will spawn around him, allowing him to drain their life to heal his own, killing them in the process. It’s worth noting that when a Spectral Dragon dies, they explode, dealing direct damage to Asorah. When Asorah reaches half health, he will start to slowly lose health when a spectral dragon is nearby. When he reaches 25% health, however, he will once again continue to drain the life out of the dragons.
Once defeated, Asorah will drop a large amount of experience as well as the «Eye of The Abyss».
The Abyssal Wasteland[]
Upon entering the Abyssal Wasteland, you will find yourself in a world shrouded in darkness with no visible day/night cycle. You will enter the world right next to a portal leading back to the overworld in case you need to turn back. Your goal here is to find Abyssal Strongholds, which contain portals leading to the next of the mod’s dimensions: The Dreadlands.
This new dark biome comes with its own spawn list of new hostile mobs that can easily overpower unsuspecting players. Here you will encounter dangerous mobs such as Depths Ghouls, Abyssal Zombies, Spectral Dragons, and Skeleton Goliaths as well as the vanilla spawning Zombies and Skeletons. It’s strongly advised you established a small base around the portal back home before you venture out and explore.
Here are some notes on the new AbyssalCraft Mobs:
Abyssal Zombies mark vanilla Zombies with a higher attack priority, serving as a distraction, if the player needs to escape.
Depths Ghouls are taller than normal mobs and can be kept at away with spaces smaller than 3 blocks high.
Spectral Dragons, in their current build, function similarly to the Ender Dragon from the vanilla version of the game. They can fly through blocks and have brief moments of invulnerability similar to their vanilla counterpart.
The Skeleton Goliaths, despite their large 4 block high size can easily match the speed of a player if detected. Their high damage output coupled with their large amounts of health makes them a difficult foe to fight against.
Here’s some notes as you explore the dark world.
Combining 8 9-clusters of Coralium Gems with one block of Abyssal Stone creates a chunk of Coralium. Smelting this chunk will produce a Refined Coralium Ingot which is used to craft or upgrade your armor and tools into Refined Coralium.
There’s a total of 3 different types of Coralium Ore found in the wasteland. All of which craft down into Refined Coralium.
The extremely tall obsidian pillars that can be found spawning around the land has a block of diamond on their tops.
Abyssal Strongholds[]
Located throughout the Abyssal Wastelands are underground fortresses known as Abyssal Strongholds. Similar to the Overworld’s Strongholds, these structures house portals to the Dreadlands and are found using Powerstone Trackers.
Functioning similarly to Eyes of Ender, Powerstone Trackers are crafted by surrounding an Eye of Ender with eight Coralium Gems. The Trackers can then be thrown into the air as they begin to float in the direction of a Stronghold. More specifically, Trackers hone in on the Dreadlands Infused Powerstone hidden away in the Abyssal Stronghold itself. The Dreadlands Infused Powerstone can only be harvested with a Refined Coralium Pickaxe or better.
Information[]
Getting Started
| In order to get started with rituals you need to create the altar to perform them at. There is a total of 8 materials you can create your Ritual Altar From. | |
| Those are: Cobblestone, Darkstone Cobblestone, Abyssal Cobblestone, Coralium Brick, Dreadstone Brick, Abyssalnite Stone Brick, Ethaxium Brick and Dark Ethaxium Brick. The materials can only be used in their specific dimension (eg. Cobblestone and Darkstone Cobblestone in the Overworld, Abyssal Stone Brick and Coralium Brick in the Abyssal Wasteland etc). | |
| To create the altar, simply place the blocks in the above formation (keep t he red area clear) and shift right-click the center block with a Necronomicon. | |
| After that, you can start performing rituals! In order to perform a ritual, place objects on the pedestals and shift right-click the altar with a Necronomicon. | |
| When performing, the pedestals project smoke towards the altar. Rituals where you gain objects always end with a bolt of lightning striking the altar. | |
| Potential Energy is required in order to perform rituals (each ritual entry shows how much you need). Potential Energy is a pure form of untapped energy originating from a higher plane of existence. It’s mainly used to fuel sacrifices made to The Great Old Ones (any ritual). Statues placed on Shoggoth monoliths are said to be capable of draining it. |
Materials
| The Ritual Altar is the main component in performing rituals. It’s used by shift right-clicking on it with a Necronomicon that has suffcient Potential Energy. For successful rituals, the nearby Ritual Pedestals will need the correct offerings placed on them. | |
| Ritual Pedestals are used to place offerings when performing rituals. This is done by interacting with the pedestal while holding the offering you wish to place. | |
| Monolith Stone is a material used to some extent with Potential Energy. It’s origins are unknown, other than that Shoggoths are capable of creating it. It can be obtained from Monoliths or Shoggoth Lairs scattered about. |
Special Materials
| An Energy Pedestal is crafted with Monolith Stones, a Shadow Gem and a Coralium Pearl. It collects Potential Energy while under a clear sky. | |
| This block serves as a method for obtaining Potential Energy. if you place Statues 3 blocks away from it (on the x or z axis), they will transfer energy to it at a fast rate. Place a Necronomicon (or other source that can hold Potential Energy) on it in order to drain it. | |
| A Monolith Stone Pillar is crafted with Monolith Stone. It’s primary use is to amplify the range of Potential Energy Manipulators (statues for example). | |
| A Ritual Charm is crafted with Gold Ingots and a Diamond. By itself it has no effect, but through rituals it can amplify various states of Potential Energy Manipulators.
Right-clicking the statue, will add the charm. |
|
| A Sacrificial Altar is crafted with Torches, Monolith Stone, A Shadow Gem and a Coralium Pearl. They convert life-force into Potential Energy.
When a living animal nearby emits black smoke, it can be killed for Potential Energy. |
|
| When a entity is targeted, it will emit smoke particles. Once the entity dies, and amount of PE equal to it’s max health will be collected. It only targets non-undead adult entities that aren’t players. It should be noted that the altar goes on a cooldown after collection a certain amount of PE, preventing collection for a minute. |
Defeating Cha’garoth[]
Once inside the Dreadstone Stronghold that holds Cha’garoth’s Lair, you will encounter multiple Dreadguards while heading to the far north end of the structure, where you will walk down a staircase until you drop down into the lair. There are 2 additional rooms within the structure, where you can find various things. When you reach the hall with fenced windows (reached after going up the staircase), Cha’garoth’s health bar will appear, and Spawns of Cha’garoth will spawn at your location as long as their master is alive. Once you’ve reached the lair, you’ll find Cha’garoth in a circular room with 2 Dreadguards (and the amount of mobs he has spawned while you were working your way towards him). If you have a bow and a large amount of arrows, the fight should be a bit easier, apart from the many minions that spawn at your location. One way to make the fight easier on your end is to have splash potions of healing (as all Dread mobs are undead), buying you time when throwing them at the enemies while healing yourself. Another method for making the fight easier is to either have the Plated Coralium Armor set or the Dreadium Samurai one (the samurai set gives you a health regen, and the Katana deals a lot of damage). Once you have defeated Cha’garoth, he will drop a Dread-plagued Gateway Key, which needs to be transmuted in order to obtain Cha’garoth’s R’lyehian Gateway Key, needed to reach the final dimension.
Rituals
AbyssalCraft includes a magic system called Rituals.
Rituals require altars to be performed. Altars are player-made structures consisting of 9 pillars with one in the center. 8 types of different materials can be used to create altars. The central pillar of the altar is usually just called the Altar, and the side pillars are usually called Pedestals.
Shift right-click an Altar using a Necronomicon to complete an Altar or to perform a ritual. When performing a ritual, items must be placed on the altar, and a type of energy called Potential Energy is required. Rituals are used for various different tasks.
The Dreadlands[]
Once inside the Dreadlands, you’ll notice the Abyssalnite/Dreaded Abyssalnite Golems, who continuously fight each other (with the exception of the dreaded one also attacking the player). These mobs can be used as an easy way to farm huge quantities of Abyssalnite, as they drop chunks of it on death. The environment in the Dreadlands is quite desolate, but there are still mobs that spawn here (apart from the aforementioned golems). In the Dreadlands Forest biomes you can find Demon Pigs and Dread Spawns (and the golems plus the Dreadling, which has a fairly average chance of spawning in all of the various Dreadlands biomes). If you happen to stumble upon a Dreadlands Mountains biome, you should be able to find larger amounts of Dreadlings, but also Fists of Cha’garoth, Spawns of Cha’garoth and the infamous Dreadguard. The only ore you can find here are the Dreaded/Dreadlands Abyssalnite ores, which can be smelted down for more Abyssalnite Ingots. There is also a Purified Dreadlands biome (which is the opposite of the normal Dreadlands biome, since this one is covered in Abyssalnite Stone instead of Dreadstone).