Troubleshooting
Содержание:
Мысли на будущее[]
В будущем можно будет возвести дополнительные сооружения.
Линия коммуникации
По существу, это прокладка рельс по пути, который вы проложили, чтобы добраться до колонии. Железная дорога позволит транспортировать вещи (посредством вагонеток с сундуками), мобов и себя самого. Прокладывайте маршрут только если колония будет постоянной. Осветите дорогу, чтобы монстры не появлялись рядом с вами (особую опасность представляют собой криперы, способные бескомпромиссно прервать линию коммуникации). На заметку: монстры не могут спауниться на рельсах.
Туннель
Довольно скучный вид линии коммуникации, однако безопасный (если освещения достаточно). Вообще, туннель довольно легко сделать, достаточно копать его размером шириной в блок и в два в высоту, это если копать под землёй. Ежели вы хотите построить туннель на поверхности, то вам придётся тратить по 5 блоков на каждый метр дороги (4 по бокам и один сверху).
Совершенствование
Если Ваша колония играет большую роль достаточно долгое время, Вы её часто посещаете либо уже живёте там, то почему бы не усовершенствовать её? Колония может стать вашей второй базой, и, возможно, основной. Создайте все удобства для хорошей жизни!
Crashes when Placing Structures
If your game crashes placing a structure (e.g. a supply camp or ship), your MineColonies and Structurize versions are probably incompatible. Update both to the latest .
CHECKLIST: Identifying why a citizen is not working
- Is it nighttime? Citizens do not work after sunset.
- Is it raining or snowing? Citizens do not work in the rain or snow.
- Did a citizen die yesterday (in-game time)? Citizens will mourn the next day and not work if one of them died the day before.
- Are there raiders (barbarians, pirates, vikings, egyptian raiders) still around? Citizens will hide during raids until all attackers are killed.
- Does their work hut have a low building level? Does the worker have low XP? Then they will often idle in between actually working until their personal XP improves and/or their work hut is upgraded.
- Is their hut PAUSED? Work huts now have a pause button. Sometimes players forget to unpause.
- Is their hunger level low? Citizens won’t work while hungry. Give them food, and if you have a Restaurant, check that it is stocked and you have hired a Cook. If they are hungry but won’t eat the food they have, fire them until they eat then rehire them.
- Do they have any open requests? They might need a tool or other item to continue their work.
- Do they have tools of the correct level?
- Is their inventory or their hut inventory full? They will get stuck if they have no room to move things in or out.
If none of these apply, go on to the next troubleshooting checklists.
CHECKLIST: Troubleshooting a citizen not working by career
- Builder: Remember to click the Build Building button inside the hut block you want to be built, then wait for the Builder to announce they have begun building.
- Forester: Set which type of tree they are allowed to cut and if they should replant them. Make sure that your trees are at ground level, or if you place them one block higher, place slabs next to them.
- Miner: Is there an ore they cannot mine in their way? Break it for them or assign them to a new mining level. Do they have cobblestone, torches, a pickaxe, a shovel, slabs, planks, and fencing (for the mineshaft)?
- Cook: Set which fuel you want them to use.
- Baker: Set which fuel you want them to use and which recipe you want them to bake.
- Smelter: Set which fuel you want them to use and which ore you want them to smelt.
- Farmer: Assign the farmer to a field. Make sure each scarecrow has a seed and make sure all tilled soil is hydrated.
- Composter: Set which items you want them to convert into compost.
- Crafter (Carpenter, Blacksmith, Mechanic, etc): The request for items must be made after the crafter is hired and the colony must have a Courier. Cancel the request at the original NPC to generate a new request, or make a new request from the Postbox. Also remember to teach them the recipes they’re allowed to craft and make sure afterwards that the recipes were saved.
- Stone Smelter: Set which fuel you want them to use. (They know their recipes already.)
CHECKLIST: Troubleshooting a Citizen not working for unknown reason
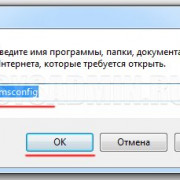
- Log out of the game. Open the config file.
- Go to the line
- Change the false to true
- Restart your game
- Watch the name area above the worker’s head. The information at the end will be important for devs/support staff to troubleshoot issues or assist you on the Discord help channels.
- Nudge worker by walking into them, off the block they are standing on or out a door.
- Recall worker to their work hut.
- Make sure the path to their worksite is clear of obstructions.
- Recall all citizens to the Town Hall.
- Pause the problematic work hut, wait a few minutes, unpause the work hut and recall the worker.
- Pause the work hut, then click ‘Restart.’ This will restart the worker.
- Fire worker, wait a few minutes, then hire the same worker.
- Empty out the worker’s personal and workhut inventories, then only give them what they request in the amount requested until they have no more requests.
- Fire worker, empty out their personal and workhut inventories, wait for them to actually get into bed at night, after sunrise, hire the same worker.
- Punch them with an empty hand (taking damage resynchronizes them with world). Never punch a guard, fire them first then punch then rehire them.
- Use the /mc colony requestsystem-reset command.
- Repair their work hut. Some workers will stop working if required elements are not present. Only the Builder can place beds, crafting tables, furnaces, chests, racks, and compost barrels. If you broke any of those, create a repair build order for the building.
- Fire worker, wait a few minutes, then hire a different worker (you will lose advantage of the experience the first worker had accumulated at this career).
FAQ
This is a FAQ section to answer common questions regarding schematics in MineColonies.
What and where is the scans folder?
The scans folder is where the schematics are saved after performing a scan using the scan tool in MineColonies. This is a client-side-only directory which is located in Minecraft’s folder under: . Freshly scanned schematics can be found in unless they have been renamed in-game. (If they aren’t there, look in .) This directory is shared between all your singleplayer games and multiplayer games.
Where is the schematic folder?
Custom schematics need to be copied inside the schematic folder. For both singleplayer and multiplayer games, the folder is under .
How to create custom huts?
To create new schematics for existing huts, there are some guidelines that you must follow: the scans MUST have the same footprint for the same style/hut’s type; the scans must contain the hut’s block, for example the Builder’s Hut block for the Builder’s Hut; the hut block need to be exactly at the same place and have the same rotation for each level; the scans’ filenames need to follow the naming convention: {StyleName}/{HutName}{HutLevel}.blueprint. For example, for the Builder’s Huts with the MyOwn style, we would have:
myown/builder1.blueprint
myown/builder2.blueprint
myown/builder3.blueprint
myown/builder4.blueprint
myown/builder5.blueprint
Note: In the build tool, the extension is hidden. HutName can be any of the listed huts below. The maximum level is 5 (except for the Tavern, its max level is 3).
Once ready, move the folder into the schematics folder and start your game. You should be able to see it with the the build tool.
Note: Remember that you need the appropriate hut in your inventory to be able to see the schematics in the build tool.
Строительный инструмент:
Строительный инструмент является наиболее важным объектом мода. Без него нельзя разместить здания, рабочие хижины. Его возможности бесконечны!Итак, на всякий случай рецепт инструмента для постройки зданий:
Чтобы разместить здание, вы должны иметь блок этого здания в инвентаре. Затем вы можете щелкнуть правой кнопкой мыши на месте, где вы хотите разместить его. Появится графический интерфейс со многими опциями в вашем распоряжении:Обзор инструмента для конструированияВ середине экрана находятся элементы управления для «корректировки» расположения постройки, которую вы собираетесь разместить;
- Синие стрелки позволяют перемещать 3D — структуру (вперед — назад — вправо — влево);
- Оранжевые знаки минус и плюс предназначены для увеличения или уменьшения постройки;
- Изогнутые стрелки оранжевого цвета предназначены для поворота структуры в направлении влево или вправо;
- Треугольники зеркально отражают изображение (для изменения справа налево и слева направо);
- Галочка нужна, чтобы начать постройку;
- Красная кнопка X предназначена для отмены процесса.
Теперь, когда вы готовы начать строить, нажмите зеленую кнопку с галочкой и все. Он будет отправлен как заказ производителю.
Настройка[]
Настройка производится с помощью файла MineColony.properties(открывать любым редактором) .
Описание доступных опций:
[Block IDs] — ID блоков(для работы с другими модами)
| Лат.название=ид | Сундук |
|---|---|
| MinerBlockID=130 | Шахтера |
| WarehouseBlockID=131 | Поставщика |
| FarmerBlockID=132 | Фермера |
| BankBlockID=133 | здания «Банк» |
| BuilderBlockID=134 | Строителя |
| CitizenBlockID=135 | Жителей |
| TownHallBlockID=136 | здания «Ратуши» |
| MarketBlockID=137 | здания «Рынок» |
| LumberjackBlockID=138 | Дровосека |
| HuntersBlindID=140 | Охотника |
| BakerBlockID=141 | Пекаря |
| BarracksBlockID=142 | здания «Бараки» |
| WarningBellID=139 | Колокол |
[City names] — названия городов
cityNames=Mine Colony;Port Royale -(по умолчанию)
[Citizen's names] — перечень имен,для использования жителями
.....

[Tips for beginners in Town Hall GUI] — настройка правил в "Ратуше"
tips1=First 4 workers work for free.
.....
[NPC messages] — Перечень слов(предложений), используемых жителями при встречи с игроком.
genericMessage1=Hello.
genericMessage2=How are you?
.....
[Options] — Глав. опции
| Лат.название=значение | Лимит |
|---|---|
| townHallRange=100 | диапазона расстояния для годных построек от 1 «Ратуши» |
| blockPlacingLimit=20 | «сундуков» на диапазон действия от 1 «Ратуши» |
| citizenWalkingRange=45 | диапазона расстояния на которое жители могут путешествовать |
| farmerWorkingRange=4 | диапазона работы Фермера от своего сундука |
| lumberjackWorkingRange=20 | диапазона работы Дровосека от своего сундука |
| minerWorkingRange=20 | диапазона работы Шахтера от своего сундука |
| hunterWorkingRange=100 | диапазона работы Охотника от своего сундука |
| builderWorkingRange1=100 | диапазона работы Строителя от своего сундука |
| warningBellVisionRange=40 | диапазона действия «Колокола» |
| creeperSafetyRange=20 | диапазона защиты от криперов |
| builderInstabuild=false | при «=true» строитель мгновенно строит здание |
| builderInfiniteResources=false | при «=true» строитель не требует ресурсов для построек |
| roadBlockID=13 | Ид. блока «Дорога» |
| playSpeech=true | Проигрывать звуки — речи и храпа(во время сна жителей) |
hunterAdditionalTargets=sheep;chicken — после "=" через ";" перечень мобов, на которых будет
охотиться Охотник
[Daily salaries] — кол-во ед. монет для ежедневного выплачивания работникам
Лат.название=кол-во ед. монет
lumberjackSalary=6
.....
[Floorplans assignment] — выбор модели здания (по умолчанию — папка foorplan)
Лат.название=название модели(с расширением "файл.floorplan")
lumberjackFloorplan=lumberjack
.....
[Quests] Квесты, выдаваемые жителями при ПКМ на них(награда получается так-же ПКМ)
Тип=Охота на моба
| Лат.название=Значение | Описание |
|---|---|
| questName1=Creepers! | Название квеста |
| questDescription1=I have got a quest… | Описание квеста |
| questType1=mobhunting | Тип квеста, пр.: mobhunting, itemgathering и т.д. |
| questMobType1=Creeper | Название моба |
| questSpawnLocation1=random | Точка спауна моба |
| questMobQuantity1=2 | Кол-во для заспауна мобов |
| questRewardItemId1=46 | Награда «Предмет=ид» за завершенный квест |
| questReputationReward1=0.2 | «Репутация=кол-во» за завершенный квест |
| questFinishedMessage1=Thank you… | Сообщение при выдачи награды |
Build Options Details
Before Hut is Built
-
- Style (top left): Here you can verify the style of schematics you have currently. You can change the style to see the list of items required for other styles, but it’s not recommended that you change a different style from here since it will most likely be in a different position (since each schematic is different).
- Builder: Here is where you can choose what Builder you want on the project. If it is out of your Builders’ range, this is where you can manually assign one.
- List: This is the list of resources that the Builder will need for the schematic style selected.
- Repair: Not needed, as the building hasn’t been built yet.
- Build Building: This is where you tell the Builder to build the building with the style selected.
After Hut is Built
-
- Schematic Style: Here you can verify the style of schematics you have currently. You can change the style, but it’s not recommended that you change it since it will most likely be in a different position.
- Builder: Here is where you can choose what Builder you want on the project. If the hut is out of your Builders’ range, this is where you can manually assign one.
- List: This is the list of resources that the Builder will need for the schematic style selected.
- Repair: This is to repair a building according to its schematic. This will remove any changes that a player has made to the current building.
- Upgrade: When you are ready to upgrade to the next level. Upgrading will come with benefits, like more furnaces for a Smelter to use (for example).
- Deconstruct: To deconstruct the building. After the Builder is done breaking the building, click the Pick Up button, which will appear where the Deconstruct button was. You will get the building’s hut block, which will keep its current level. This is so you can place it somewhere else using the build tool.
Detailed Walkthrough
If you’re here, CONGRATULATIONS! You have already MineColonies and are ready to embark on an adventure to explore, conquer and establish your own colony. Work hard and turn it into a thriving town. Hone your leadership skills and grow grow grow into a city! Lastly, can you be a grand leader and finally achieve a metropolis? (Check your ingame MineColonies Achievements.)
To avoid mistakes and frustation, read through this entire guide carefully before starting to play.
Placement of the Supply Ship or Supply Camp
To place the Supply Ship, you need to have a large enough body of water (at least 32 x 20).
To place the Supply Camp, you need to have a large enough flat, clear piece of land (at least 16×17 blocks).
When you place the Supply Ship/Camp, it will spawn a chest that will contain the Town Hall block and the build tool. Once the Supply Ship/Camp is placed, you can’t place another in the world.
Place the Supply Ship/Camp by right-clicking the item directly on the water/ground – if you have a build tool already, don’t use it for this (you’re expected to get the tool from the camp/ship rather than already having one).
Hint: If you’re not able to place the Supply Camp/Ship, try it block by block: one to the right, left, closer or further from the area you cleared. The area cannot contain any holes or have any flowers, grass, ferns, seaweed, coral etc.
Town Hall
The protected area of your colony (once the Town Hall has been placed) will be a square 4 chunks in radius, measured from the chunk where you placed your Town Hall block the first time (with the default config). Therefore, plan carefully where you want to place your Town Hall. 64 blocks (4 chunks x 4 chunks) in every direction from that chunk will be your protected Town area including mountains, hills, lakes, oceans, caves, world generated structures, etc. from bedrock to sky limit.
Hint: The most important tool you will need for the entire mod is the build tool (check our build tool page). Obtain one from the Supply Ship/Camp or craft another so you can place all the huts (including the Town Hall) in the perfect spot.
Build Tool Video.
Due to the protected area of each colony, you have to carefully scout your surrounding to make sure you are clear of any other colonies nearby preventing you from placing your Town Hall or limiting your colony area in that direction (in multiplayer, etc.). If there is another colony too close to your current position, you won’t be able to place a Town Hall.
Location info of the next closest colony exits in the debug screen (displayed when you press F3). If there is a colony close to your current position, it will also show you the required distance away to place your Town Hall.
For example, in the official MineColonies server it will be the default 4 chunk radius (4 + 4 + 1 {center Chunk where Town Hall was placed} = 9 chunks or 144 total blocks required). It therefore, will tell you: “Next colony is XXX blocks away. (272 required to place a colony).”
Now, after you have explored, thought carefully, planned, and found the perfect spot to start your colony, let’s take a look at the steps to get your colony running!
Farm GUI
When accessing the Farm block by right-clicking on it, you will see a GUI with different options:
- Hut Level: Tells you the type of hut and the build level of the building you have selected.
- Worker Assigned: Tells you the worker assigned to this building and their worker level. The worker levels up in time by working. The higher their level, the faster and more efficient they will be.
- Manage Workers: Lets you change which worker is assigned to work at this hut. There can only be one worker at each hut. Note: this only works if you have turned the worker hiring mode in the Town Hall block to manual, otherwise your citizens will be hired automatically.
- Recall Worker: Recalls the worker at this building to their hut block. You might use it if they are stuck somewhere, you want to see what they have, or want to give them something directly.
- Build Options: Lets you create a build, upgrade, reposition, or repair build order for this hut. To learn more about the building system, please visit the Builder page.
- Delivery Priority: You can set the priority that a Courier will visit this hut and pick up items (when the worker at this hut issues a request), or you can tell Couriers to never visit this hut to pick up items. You can also tell a Courier to do a pickup now using the Request Pickup Now button. (For the pickup priority, 10 is the highest.)
- List of Recipes and Teach Recipe: When clicking the list of recipes button, you see all the recipes you have taught this hut and can remove them. When clicking teach recipe, it opens a crafting grid which allows you to teach this hut recipes (not the worker).
- Inventory: Here you can access the hut block’s storage, where the worker at this hut takes and deposits materials. They will also use any racks or chests that were placed in the hut when it was built or upgraded, so be sure to check those as well!
- ?: Some huts have an in-game guide. Press the ? button to access it.
- A chest icon: Click this button to see all the items in the hut’s storage (including the hut block’s inventory and any racks/chests that came with the hut). Clicking the ? button next to an item’s count will highlight the storage container it’s in.
This is page two of the Farm GUI. It shows the Fields that are available (recognizable by the crop in its GUI and its distance). You can assign them to this Farmer as well.
- Automatic/Manual: Automatic by default. Here you can define if you prefer to manually assign the Fields for this Farmer.
- Field: This is the list of recognized fields. If the field shows an X, that means it is already assigned to a Farmer and will list the name of the Farmer who takes care of that field. If the X is red and the button is not grayed out, that field belongs to the current Farmer and you can unassign it. If the field has a green check, then that field can be assigned to the Farmer. If the button is grayed out with a check, that means that no one is assigned to that field but the Farmer can not accept any more fields.
This is page three of the Farm GUI. It lets you choose whether the Farmer will request fertilizer (compost or bone meal).
Notes
- The Builder will not start another build assignment until they have finished the current one.
- The Builder can ONLY upgrade other huts to the level of their Builder’s Hut. Upgrade the Builder’s Hut to further upgrade other buildings.
- You can rearrange the priority and cancel the build requests in the Town Hall GUI under the Work Orders symbol (!).
- The Builder will collect any blocks they remove and deposit them in their hut inventory and any racks/chests in their hut. Items are never lost or destroyed.
If you see the Builder has not finished building/upgrading any build order and they aren’t asking for any materials, go to the Builder’s Hut and recall the Builder and wait a bit to see what they need. You can also go to page 2 of the Builder’s Hut GUI and check the list of materials required. Any material in the list that is missing will be in red.
If a build request is created but no Builder starts building, the building may be out of their range (which is 100 blocks from their hut). Cancel the build order, then go to Build Options of the hut you want to be built and manually assign a Builder (top right).
If the build order is within their range and they still aren’t building it, check if you’ve set them to Manual on the third page of their hut GUI. If you have, you’ll need to choose build orders for them yourself (also in the third page of their hut GUI).
The higher a Builder’s Adaptability skill, the faster they’ll place blocks. Similarly, the higher their Athletics skill, the faster they’ll break blocks.
Kill Commands
| Command | Command Description |
|---|---|
| Default permission level: OP | Kills all raiders (barbarians, pirates, vikings, or egyptian raiders) inside all colonies.Example: |
| Default permission level: OP | Kills all animals (peaceful mobs) inside all colonies.Example: |
| Default permission level: OP | Kills all monsters (hostile mobs) inside all colonies.Example: |
| Default permission level: OP | Kills all chickens inside all colonies.Example: |
| Default permission level: OP | Kills all cows inside all colonies.Example: |
| Default permission level: OP | Kills all pigs inside all colonies.Example: |
| Default permission level: OP | Kills all sheep inside all colonies.Example: |
Base Commands
| Command | Command Description |
|---|---|
| Default Permission Level: OP | Makes a backup of all colony data. |
| Default Permission Level: All | Lists the wiki and the Discord links in chat. |
| Default Permission Level: All | Teleports a colony owner back to the Town Hall of their colony. |
| Default Permission Level: OP | Schedules a raid for every colony. You can choose if it starts now or the next Minecraft night, as well as its type. |
| Default Permission Level: OP | Resets the ability to place a supply camp or ship. |
| Default Permission Level: All | Randomly teleports you. Will place you outside the range of someone else’s colony. |
| Default Permission Level: All | Outputs how far away the player is from a colony (if they are near one) or that there are no colonies nearby. |
| Default Permission Level: OP | Outputs your name, the name of your colony, and the coordinates for the center of your colony. |
Рабочие:
Как мы уже упоминали ранее, большинство зданий Минколоний имеют функцию укрытия работников разной природы. Здесь граждане не будут работать в дождливую погоду.
Уровень квалификации работников:
Была создана система для повышения квалификации работников. Уровень их дома — это то, что ограничивает уровень, которого они могут достичь. Каждый раз, когда вы увеличиваете уровень их ДОМА, предел максимального уровня работника будет удваиваться по сравнению с предыдущим пределом. В настоящее время предел рабочего уровня составляет 100 (конечно, после того, как вы выполнили уровень сборки 5). Уровень их работы здания определяет скорость, с которой они прогрессируют.
| Уровень здания | Максимальный рабочий уровень |
|---|---|
| 2 | |
| 1 | 4 |
| 2 | 8 |
| 3 | 16 |
| 4 | 32 |
| 5 | 100 |
Уровни инструментов / оружия:
Существует система уровней для типов инструментов и оружия, которые рабочие могут использовать в зависимости от уровня в рабочем здании. Уровень их строительства — это то, что налагает ограничение на «уровень инструмента / оружия», который может использовать работник. Каждый раз, когда вы поднимаете уровень здания, уровень инструмента / оружия, который рабочий может использовать, увеличивается.
| Уровень здания | Уровень инструмента / оружия | Уровень материала |
|---|---|---|
| Дерево или золото (+0 очарование) | Каменный уровень | |
| 1 | Чары на камень + 0 (или чары на дерево / золото + 1) | Уровень железа |
| 2 | Железо + 0 чар (или дерево / золото + 2 чар или камень + 1 чар) | Алмазный уровень |
| 3 | Алмаз + 0 чар (или дерево / золото + 3 чар, или камень + 2 чар, или железо + 1 чар) | Обсидиановый уровень |
| 4 | Все инструменты + 0 чар (или дерево / золото + 4 чар, или камень + 3 чар, или железо + 2 чар, или алмаз + 1 чар) | Уровень кобальта |
| 5 | Все инструменты + неограниченные чары | Любой уровень майнинга |
Луки / Уровни удочки:
Как и инструменты / оружие, тип луков и удочек, которые могут использовать рабочие, зависит от уровня их строения. Вот сводная таблица:
| Уровень здания | Колдовство |
|---|---|
| + o чары | |
| 1 | + o чары |
| 2 | + 1 чары |
| 3 | + 2 чар |
| 4 | + 3 чар |
| 5 | неограниченный |
Охранная броня:
Чтобы определить тип брони, которую могут использовать охранники, вы должны повысить уровень их строения, а охранник — повысить уровень.
| Тип прихватки | Уровень охраны | Уровень башни |
|---|---|---|
| кожа | 0 — 20 | 1 — 3 |
| золото | 0 — 20 | 1 — 4 |
| цепь | 0 — 20 | 2 — 5 |
| железо | 5 — 30 | 3 — 5 |
| бриллиант | 15 — 99 | 4 — 5 |
Черты характера:
У каждого работника есть черты, которые им нужно улучшить, чтобы выровнять.При нажатии на кнопку «Аренда», вы увидите список доступных работников с их лучшими функциями. Если линия зеленая, это ее основная линия, а желтая — ее дополнительная линия. Это позволяет вам наилучшим образом выбрать своего работника.