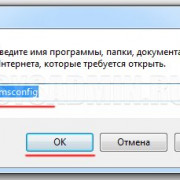
Скачать плагин dtltraders для майнкрафт
Содержание:
Acknowledgements
- Noggog — creator of Synthesis who very patiently helped me learn how to make patchers, and did not rip my head off when I incessantly requested new features for both the UI and under the hood
- SteveTownsend — for helping me learn how to use Synthesis to handle BSA archives, and for creating the package I needed to get additional textures from Nifs (and indeed for writing the function to do it).
- Janquel — for suggesting the name for this patcher
- DarkladyLexy — for being my first beta tester & making several good suggestions for SettingsGen mode.
- trawzified — for fixing up the Markdown on this README file.
- JollyRoger — for suggesting integration with Merge Plugins Hide.
- All of the great NPC appearance mod authors that made this patcher necessary — rxkx22 (Bijin series), Pandorable for her eponymous mods, Southpawe (Northbourne series), PoeticAnt44 (Pride of Skyrim), deletepch (Nordic Faces… but please don’t delete the PCH; it’s beautiful!) and many others! Thank you for making it so hard to choose!
Adding Click Commands
By default, «/npc command» will run commands as the server. Use «-p» to run as the player who clicked instead.
For example: Use to make an NPC automatically execute «/help» as the player when clicked.
To auto-fill the player name, use «<p>». To autofill the NPC ID, use «<npc>».
For example: Use to make an NPC automatically kick the player when clicked.
Requiring Permissions
By default, anybody can click the NPC to cause a command to execute, without any permission requirement.
If is used, it will execute as-player, meaning any permissions check the command itself has will be required for the player.
If is used, it will execute as-op, meaning the player will be treated as if they were a server operator, and thus usually permissions won’t be expected (unless you have a permissions plugin that doesn’t respect op, or a protection plugin that disables op). Be warned that will tend to risk side effects or performance problems.
Generally, it’s best to execute as-server (don’t specify or to use the default as-server), which will not require any permissions. You will need to use to fill in the playername wherever the command requires one.
If you want to add your own additional permissions requirement, use when adding the command.
A Click Command To Speak
To make an NPC command that causes an NPC to speak to the player (if you don’t need the full options of the NPC command feature, just use instead), you can do:
This uses the command, targeted at the clicking player using , speaking from the clicked NPC using . The command needs «quotes» around it to prevent misinterpretation of the input arguments.
Bungee
On Bungee servers, this supports the Bungee command, like . Note that this is a special case built into Citizens internally, and bypasses any normal permission requirements automatically.
Commands
- /npc_add => create a new NPC and edit it
- /npc_edit => edit the NPC you are looking at or specified ID
- /npc_remove => erase the NPC you are looking at or specified ID
- /npc_sound => record sound for your npc to say
- /npc_end => stop editing an NPC
- /npc OPTION VALUE => set a value of an option of your NPC
- /npc_reset => removes all NPCs
- /npc_pathtest => follow NPC path
- /npc_list => list all NPCs
- /npc_way => draws path of the NPC you are looking at or specified ID
NPC_ADDCreates a new NPC, and edits it.It will be created where you stand, and be looking the same way that you are. Using /npc_add XXXX (npc ID from /npc_list) will clone the NPC to your position
NPC_EDITEdit an NPC (not needed if you just did /npc_add)Then you can use the command: /npc
NPC_ENDStop editing an NPC
NPCBy entering the command alone, you will see what values are currently set. Option values:
- attackdistance XX => Distance between NPC and the target needed for the NPC to ignore the target and go back to spawn
- bye reset/»TEXT» «TEXT2″ etc => Dont forgot the \», this what will be said when the player walks away from the NPC
- damageamount XXX => Damage done by that NPC when he hits a player
- damagedistance XXX => Min distance for the NPC to hit a player (3 is default, maybe 20-30 needed for snipers?)
- damageinterval XXX => Interval in seconds that the NPC has to wait before attacking again
- enable true/false => Enable (default) or disable the NPC without deleting it (notice that when you are editing a bot it will stay active until you say /npc_end)
- radius XXX => Radius in which the NPC will detect the player
- health XXX =>_ To set the Health of the NPC (limited by rust to max 100)_
- hello reset/»TEXT» «TEXT2″ etc => Dont forgot the \», this what will be said when the player gets close to the NPC
- hurt reset/»TEXT» «TEXT2″ etc => Dont forgot the \», set a message to tell the player when he hurts the NPC
- hostile true/false_ => Set the NPC Hostile, will attack players on sight (radius is the sight limit)_
- invulnerable true/false => To set the NPC invulnerable or not
- kill reset/»TEXT» «TEXT2″ etc => Dont forgot the \», set a message to tell the player when he kills the NPC
- kit reset/»KitName» => To set the kit of this NPC, requires the Kits plugin (see below)
- lootable true/false_ => Set if the NPC is lootable or not_
- maxdistance XXX => Max distance from the spawn point that the NPC can run from (while attacking a player)
- name «THE NAME» => To set a name to the NPC
- respawn true/false XX =>_ To set it to respawn on death after XX seconds, default is instant respawn_
- spawn new =>_ To set the new spawn location_
- speed XXX => To set the NPC running speed (while chasing a player)
- stopandtalk true/false XXX_ => To set if NPC should stop when a player talks to it, and if true for how much time.
- use reset/»TEXT» «TEXT2″ etc => Dont forgot the \», this what will be said when the player presses USE on the NPC_
- playTune True/False allow the npc to play a tune
- waypoints reset/»Waypoint list Name» => To set waypoints of an NPC
- hitchance float_ => chance to hit target_
- fireduration float => time to fire
- reloadduration float => time to reload
- defend true/false_ => attack if attacked_
- evade true/false_ => move if hit while being attacked_
- evdist float_ => how far to move when hit (some randomization is built-in)_
- allowsit_ => Find a chair nearby and sit on spawn_
- follow_ => Follow the attacker as they are running out of range (default is true as with older versions)
- sit_ => Make the NPC sit (toggles allowsit)_
- stand_ => Make the NPC stand (toggles allowsit)_
- needsAmmo true/false_ => needs to have ammo in inventory to shoot_
- sound => recorded sound name
- soundonenter => play the sound on enter (true/false)
- soundonuse => play the sound on use (true/false)
NPC WAYPOINTS:You will need to make waypoints with the plugin. Create a set of waypoints with NAME and use /npc waypoints NAME when editing your NPC.
NPC KIT:
You will need the plugin. Create a new kit with the kit plugin like you usually do, then:/kit add NAME «random description» -authlevel2 (the level is set so NO players can use the kit, only admins and NPCs)Then while editing the NPC do: /npc kit NAME (being the same name as the kit ofc)
NPC ATTACK MOVEMENTS & PATHFINDING:The Pathfinding is still not perfect, but it’s getting there. Currently, the main problem isn’t really coming from the Pathfinding but from the HumanNPC plugin because of the way i wrote it, so I’ll need to rewrite a part of the plugin to make better movements and player attacks.You will need to download PathFinding for Rust to make the NPC attack movements work. If the NPC can’t find any paths for 5 seconds it will stop targetting the entity and go back to its spawn point with full health.
Installation
Extract the downloaded folder to your drive. I prefer . Add as an executable in MO2. At this time, the .exe does not have a user interface built in. Instead, you will need to add the patcher to Synthesis as a Git Repository and run Synthesis (through MO2). This will be updated as soon as Synthesis supports exporting patchers with UI. In the meantime, add the patcher to Synthesis by clicking «Git Repository» in the top left corner -> Input tab -> Repository Path = https://github.com/Piranha91/NPC-Plugin-Chooser. Choose the only available project from the Project dropdown menu and click the blue circle in the bottom right corner. Configure the settings from the patcher’s settings menu and then either copy the settings to where the .exe is expecting them, or run the patcher directly through Synthesis. Note: it is expected that you run the patcher through MO2, either via Synthesis or directly as the .exe.
Transferring settings from Synthesis to the standalone patcher
Configure the settings in Synthesis to reflect your preferences. Then, you will need to actually run the patcher to generate or update the settings.json file. However, if you like, you can immediately stop the patcher by clicking the faded Abort button:
Now, you should have a settings.json file in your folder. Copy that file to , replacing the settings.json file that already exists there. Then you can add the patcher as an executable in MO2 and run it.
Running standalone executable
Output plugin will be named NPC Appearance.esp (you probably won’t want to run this patcher every time you run Synthesis, so having the results not in Synthesis.esp will be convenient).
Cons
Every time you want to tweak a setting you will need to go to Synthesis, perform the tweak, and then re-copy the settings json to the location the executable expects it in.
Cons
- Output will be named Synthesis.esp
- You will probably want to disable all other patchers when running this one, and disable it when running your normal Synthesis patchers.
Features
- Fully configurable
- Can say hi when you get close to them
- Can say goodbye when you get away from them
- Can say something when you try interacting with them (USE)
- Can say ouch when you hit them
- Can say that you are a murderer when you kill them
- Multiple messages are supported (random one chosen)
- Set their name
- Set their kits (Kit plugin required)
- Set Waypoints so they can walk around the map
- Set if they are invulnerable
- Set their respawn time if they die
- NPCs can defend themselves
- Set NPC Chasing speed
- Set NPC Damage
- Set NPC Max Chasing distance
- Set NPC Max View distance
- Set NPC Hostility
- Set NPC Evasion when hit
- Have NPC find and sit in a chair it finds in range
- While chasing or using Waypoints, the NPC will try to detect automatically the best ground position (except during evasion, work pending)
FAQ
Why doesn’t the .exe file have a UI like the Synthesis patcher? Why do I need to copy settings between them?
Currently, when exporting Synthesis patchers to .exe, the UI does not get exported with it. As soon as this changes I will update the patcher to break the Synthesis dependence (but you will still be able to run it via Synthesis if that’s what you prefer, and you don’t mind the output being named Synthesis.esp).
I’m using Nordic Faces, which doesn’t have a plugin! How do I forward the appearance of Nordic Faces NPCs?
This is what the Forced Asset Directory setting is for. For Plugin choose Skyrim.esm (or whichever plugin the NPC is first referenced in), and for Forced Asset Directory type in the MO2 folder of Nordic Faces (e.g. ).
I’ve added a lot of plugins and the UI is laggy.
That’s not a Q. Furthermore, coding the UI is beyond my current capabilities; I’m depending purely and exclusively on the Synthesis UI and that is how it performs.
Can you make it so that once you choose a plugin, only NPCs from that plugin are listed when searching by EditorID?
That would be great, but again I am reliant on the Synthesis UI and that is not currently a feature.
For Developers
Hooks were implemented to allow other plugins to interact with this one. None of them have return values (can be edited if needed). New hooks can be added if they make sense.
Note: All NPC have unique userIDs, (BasePlayer.userID), so you may easily save information of NPC by userID.
Called when the NCP is getting hit
Called when the NCP is getting used (pressed use while aiming the NPC)
Called when a player gets in range of the NPC
Called when a player gets out of range of the NPC
Called when an NPC gets killed
Called when an NPC reachs a waypoint and changes to next waypoint
Called when an NPC respawns
Called when an NPC gets looted
Creates npc and returns BasePlayer
Other Options
Other ways you can control include:
- to attach temporary permissions to the player (generally don’t use this, instead use … or just execute as-server)
- to make the command respond to left clicks (punch/attack). Note that this may not work if PvP is disabled.
- to make the command respond to right clicks (standard interact).
- to make a command only usable a certain number of times per player (in this example, 5 usages).
- to make the command only usable once per certain time period (in this example, 10 seconds), for each player.
- to make the command only usable once per certain time period (in this example, 10 seconds), globally (nobody can use the NPC again until the cooldown ends).
- to make the command have a delay before it activates (in this example, 40 ticks, aka 2 seconds).
- to make the command have a cost using any Vault-compatible economy plugin (in this example, $50). This will refuse to run for players that don’t have enough money, and automatically take the money before executing the command for those that do have enough.
- to make the command have an experience point cost. Works similar to ‘cost’, but for xp.
- to open a GUI to configure an item-cost (the player has to give the item for the command to execute).
There maybe be more options available for not yet explained here, so type in-game to see any such options.
Кнопка Фракции[]
При нажатии на кнопку «Фракции» откроется окно редактирования фракций. Сами же фракции и достижения можно увидеть в режимах выживания или приключения в верхних закладках внутреннего инвентаря. При условии, что вы взаимодействовали с NPC той или иной фракции!
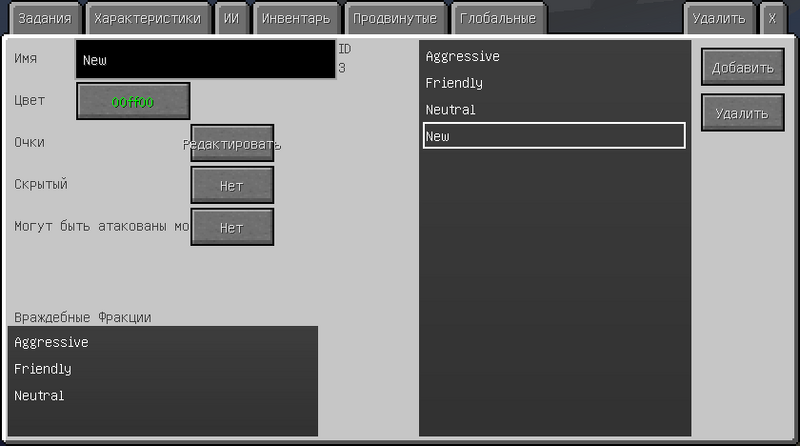
- Кнопки «Добавить» и «Удалить» — отвечают за добавление новой фракции и удаление выбранной из списка в центре.
- Поле «Имя» — Названия вашей Фракции. Можно изменить.
- Кнопка Цвет — выбор цвета для вашей фракции. Именно этого цвета будут Имена NPC с этой фракцией, а также этого цвета она будет указываться у вас в списке. Цвета можно выбрать в цветовой палитре или вписать HTML код самостоятельно.
С версии 1.8 появилась палитра цветов, где, простым кликом по цветовому полю, можно выбрать цвет.
Вот некоторые Коды цветов:
| Цвет | Код |
|---|---|
| Maroon | #800000 |
| DarkRed | #8B0000 |
| FireBrick | #B22222 |
| Red | #FF0000 |
| Salmon | #FA8072 |
| Tomato | #FF6347 |
| Coral | #FF7F50 |
| OrangeRed | #FF4500 |
| Chocolate | #D2691E |
| SandyBrown | #F4A460 |
| DarkOrange | #FF8C00 |
| Orange | #FFA500 |
| DarkGoldenrod | #B8860B |
| Goldenrod | #DAA520 |
| Gold | #FFD700 |
| Olive | #808000 |
| Yellow | #FFFF00 |
| YellowGreen | #9ACD32 |
| GreenYellow | #ADFF2F |
| Chartreuse | #7FFF00 |
| LawnGreen | #7CFC00 |
| Green | #008000 |
| Lime | #00FF00 |
| LimeGreen | #32CD32 |
| SpringGreen | #00FF7F |
| MediumSpringGreen | #00FA9A |
| Turquoise | #40E0D0 |
| LightSeaGreen | #20B2AA |
| MediumTurquoise | #48D1CC |
| Teal | #008080 |
| DarkCyan | #008B8B |
| Aqua | #00FFFF |
| Cyan | #00FFFF |
| DarkTurquoise | #00CED1 |
| DeepSkyBlue | #00BFFF |
| DodgerBlue | #1E90FF |
| RoyalBlue | #4169E1 |
| Navy | #000080 |
| DarkBlue | #00008B |
| MediumBlue | #0000CD |
| Blue | #0000FF |
| BlueViolet | #8A2BE2 |
| DarkOrchid | #9932CC |
| DarkViolet | #9400D3 |
| Purple | #800080 |
| DarkMagenta | #8B008B |
| Fuchsia | #FF00FF |
| Magenta | #FF00FF |
| MediumVioletRed | #C71585 |
| DeepPink | #FF1493 |
| HotPink | #FF69B4 |
| Crimson | #DC143C |
| Brown | #A52A2A |
| IndianRed | #CD5C5C |
| RosyBrown | #BC8F8F |
| LightCoral | #F08080 |
| Snow | #FFFAFA |
| MistyRose | #FFE4E1 |
| DarkSalmon | #E9967A |
| LightSalmon | #FFA07A |
| Sienna | #A0522D |
| SeaShell | #FFF5EE |
| SaddleBrown | #8B4513 |
| Peachpuff | #FFDAB9 |
| Peru | #CD853F |
| Linen | #FAF0E6 |
| Bisque | #FFE4C4 |
| Burlywood | #DEB887 |
| Tan | #D2B48C |
| AntiqueWhite | #FAEBD7 |
| NavajoWhite | #FFDEAD |
| BlanchedAlmond | #FFEBCD |
| PapayaWhip | #FFEFD5 |
| Moccasin | #FFE4B5 |
| Wheat | #F5DEB3 |
| Oldlace | #FDF5E6 |
| FloralWhite | #FFFAF0 |
| Cornsilk | #FFF8DC |
| Khaki | #F0E68C |
| LemonChiffon | #FFFACD |
| PaleGoldenrod | #EEE8AA |
| DarkKhaki | #BDB76B |
| Beige | #F5F5DC |
| LightGoldenrodYellow | #FAFAD2 |
| LightYellow | #FFFFE0 |
| Ivory | #FFFFF0 |
| OliveDrab | #6B8E23 |
| DarkOliveGreen | #556B2F |
| DarkSeaGreen | #8FBC8F |
| DarkGreen | #006400 |
| ForestGreen | #228B22 |
| LightGreen | #90EE90 |
| PaleGreen | #98FB98 |
| Honeydew | #F0FFF0 |
| SeaGreen | #2E8B57 |
| MediumSeaGreen | #3CB371 |
| Mintcream | #F5FFFA |
| MediumAquamarine | #66CDAA |
| Aquamarine | #7FFFD4 |
| DarkSlateGray | #2F4F4F |
| PaleTurquoise | #AFEEEE |
| LightCyan | #E0FFFF |
| Azure | #F0FFFF |
| CadetBlue | #5F9EA0 |
| PowderBlue | #B0E0E6 |
| LightBlue | #ADD8E6 |
| SkyBlue | #87CEEB |
| LightskyBlue | #87CEFA |
| SteelBlue | #4682B4 |
| AliceBlue | #F0F8FF |
| SlateGray | #708090 |
| LightSlateGray | #778899 |
| LightsteelBlue | #B0C4DE |
| CornflowerBlue | #6495ED |
| Lavender | #E6E6FA |
| GhostWhite | #F8F8FF |
| MidnightBlue | #191970 |
| SlateBlue | #6A5ACD |
| DarkSlateBlue | #483D8B |
| MediumSlateBlue | #7B68EE |
| MediumPurple | #9370DB |
| Indigo | #4B0082 |
| MediumOrchid | #BA55D3 |
| Plum | #DDA0DD |
| Violet | #EE82EE |
| Thistle | #D8BFD8 |
| Orchid | #DA70D6 |
| LavenderBlush | #FFF0F5 |
| PaleVioletRed | #DB7093 |
| Pink | #FFC0CB |
| LightPink | #FFB6C1 |
| Black | #000000 |
| DimGray | #696969 |
| Gray | #808080 |
| DarkGray | #A9A9A9 |
| Silver | #C0C0C0 |
| LightGrey | #D3D3D3 |
| Gainsboro | #DCDCDC |
| WhiteSmoke | #F5F5F5 |
| White | #FFFFFF |
- Позиция «Очки» , кнопка «Редактировать» — откроет окно редактирования очков фракции.
- Поле «По-умолчанию» — здесь указываются очки, которые игрок получит сразу же, когда обнаружит эту фракцию.
- Поля «Недружелюбные <-> нейтральные» — здесь указываются очки, при которых фракция станет не дружелюбной.
- Поля «Нейтральные <-> дружелюбные» — здесь указываются очки, при которых фракция станет дружелюбной.
Иначе говоря, если вы установите: по-ум. = 0, недруг. = −15000, а друж. = 15000, то Когда игрок найдет эту фракцию, у него будет репутация = 0 и отношение нейтральное. Как только игрок наберёт 15000 очков и больше — фракция станет дружелюбной, ну а если сбавит ниже −15000 то враждебной.
- Позиция «Скрытый» , кнопки «Да, Нет» — отвечает за то, будет ли отображаться эта фракция в списке у игроков.
- Позиция «Могут быть атакованы мобами» , кнопка «Да, Нет» — отвечает за то, будут ли МОБы атаковать эту фракцию, в том числе Мобы других модов.
- Список «Враждебные Фракции» — в этом списке вы можете выбрать фракции, которые данная фракция будет атаковать, просто нажимая на них ЛКМ, и ещё раз чтобы отменить выделение. Настройки NPC на атаку враждебных фракций находятся в закладке «Продвинутые», кнопка «Фракции» у каждого NPC!
Свои собственные звуки
Это несколько сложнее чем, просто залить текстуры, как написано выше.
- название файла на английском, не должно содержать большие буквы,символы,пробелы (вместо них можно использовать знак «_»)
- в формате
- размер файла не желательно делать больше, чем 2Мб. Это примерно 30-45 секунд звука в моно канале, самого низкого качества из формата «.ogg» . Если превысить размер в 2Мб, то в сетевой игре игрок, попавший в зону срабатывания вашего звука, зависнет на несколько секунд, так как для него будет разворачиваться этот огромный файл. В одиночной игре игрок подвисает, но совместно со всем миром,нежели в сетевой.
Под звуком можно принимать музыку, записанный голос и прочие звуки. Для создания формата .ogg используйте различные программы или конвертеры.
Далее:
Заходим в папку по пути:
в Win XP это — %AppData%/.minecraft/customnpcs/assets/customnpcs/sounds
Тут создаём себе папку, название которой должно быть на английском, не должно содержать большие буквы,символы,пробелы. Пример: «mysound»
Ну,а теперь самое сложное:
- Вернемся назад, в папку: .minecraft/mods/customnpcs/assets/customnpcs/
- Теперь,чтобы внести сюда свой файл, пролистаем весь текст до конца. Перед самой нижней/последней скобкой «}» жмём кнопку ↵ Enter и введем следующий текст:
, "(название вашего звука в игре)": {"category": "player","sounds": ["(путь к вашему файлу и его название через / без формата)"]}
Пример: Вы создали папку с названием mysound и закинули туда звуковой файл с названием say_hello.ogg. Но вы хотите, чтобы в игре он отображался как My NPC Say hello. Тогда ваша строчка должна будет выглядеть так:
, "My NPC Say hello": {"category": "player","sounds": ["mysound/say_hello"]}
Теперь, когда вы сохраните этот файл, зайдете/перезайдёте в игру и нажмёте кнопку «Выбрать Звук», то в открывшемся окне, в самом низу списка увидите строчку My NPC Say hello. Это и будет ваш файл.
• Если вы хотите разом добавить много файлов, то просто повторите процедуру: Скачать в папку/записать в файл.
Если вы хотите, чтобы ваш NPC играл один из нескольких звуков со случайным выбором, то укажите каждый путь к каждому файлу, через запятую, в одной строке.
, "(название вашего звука в игре)": {"category": "player","sounds": }
Из примера выше. Ваша папка mysound, три звуковых файла say_hello_1.ogg, say_hello_2.ogg, say_hello_3.ogg. Название в игре то же — My NPC Say hello. Тогда ваша строчка будет выглядеть так:
, "My NPC Say hello": {"category": "player","sounds": ["mysound/say_hello_1","mysound/say_hello_2","mysound/say_hello_3"]}
Если вы добавили конкретно музыкальный файл, а не звук ( т.е. музыка,которую играет NPC Бард ) , то укажите это в строчке после пути параметром stream = true, весь путь указан в скобках «{ }» и начинается с «name»: . То бишь так:
, "(название вашего звука в игре)": {"category": "player","sounds": }
Строчка будет выглядеть так (пример) :
, "My NPC Say hello": {"category": "player","sounds": [{"name":"mysound/say_hello_1","mysound/say_hello_2","mysound/say_hello_3", "stream": true}]}
Кнопка Linked[]
Linked (рус. «Сопряжённый») — откроет окно выбора связывания. Вернее, эта кнопка откроет список с созданными связями, кликнув на одну из них, к NPC сразу же будут применена эта связь.
На самом деле эти самые связи — это нечто на вроде сохранённых настроек всего NPC, всех его закладок (Задания, Характеристики, ИИ, Инвентарь и Продвинутые). И если на одном NPC есть какие-то настройки диалогов и/или квестов, а вам нужен этот NPC в 2х или более местах разом, то клонировать его не обязательно, для этого эта связь и существует.
А также при редактировании одного NPC со связью изменит и всех остальных связанных NPC. А действия игрока с одним из них, распространиться и на других.
Создать это сохранение-связь можно в Закладке «Глобальные». Смотри раздел «Кнопка Linked» в статье
Как установить плагин ServerSelectorX Premium?
Для ванильных ядрер (Spigot/Paper…)
Установите jar-файл плагина на хаб-сервер(ы):Для 1.13.2+ — ServerSelectorX-Premium-2.1.8.jar — Требуется Java 11+Для 1.7.10-1.12.2 — ServerSelectorX-Premium-2.1.8-legacy.jar — Требуется Java 8+
Вики: https://github.com/ServerSelectorX/ServerSelectorX/wiki
SSX-Connector предназначен для отправки данных о сервере на хаб-сервер, поэтому в меню можно отображать подробную информацию о сервере. Установите его на всех серверах: https://github.com/ServerSelectorX/ServerSelectorX/wiki/Installing-SSX-Connector
Один jar-файл SSX Connector работает со всеми версиями, начиная с 1.7.10.
Sponge
Экспериментальный плагин для ядра Sponge так же доступ отдельно к загрузке
Forge и fabric в настоящее время не поддерживаются
Права плагина:
— quests.quest — Показывает список ваших квестов — quests.questinfo — Информация о квесте — quests.quests — Помощь по квестам — quests.list — Список всех квестов — quests.take — Разрешение на получение квеста — quests.quit — Разрешение для отказа от квеста — quests.editor.editor — Позволяет открыть панель для редактирование квестов — quests.editor.create — Позволяет создать новый квест — quests.editor.edit — Позволяет редактировать квест — quests.editor.delete — Позволяет удалить квест — quests.editor.events.editor — Позволяет открыть панель ивентов — quests.editor.events.create — Позволяет создать новый ивент — quests.editor.events.edit — Позволяет редактировать ивенты — quests.editor.events.delete — Позволяет удалять ивенты — quests.stats — Позволяет посмотреть статистику по квестам — quests.top — Показывает топ игроков по квестам — quests.admin — Разрешает пользоваться всеми админскими командами — quests.admin.give — Даёт квест игроку — quests.admin.quit — Забирает квест у игрока — quests.admin.points — Даёт игроку определённое количество поинтов (очков) — quests.admin.takepoints — Тоже самое что и quests.admin.points — quests.admin.givepoints — Тоже самое что и quests.admin.points — quests.admin.pointsall — Даёт всем игрокам определённое количество поинтов (очков) — quests.admin.finish — Завершает квест определённому игроку — quests.admin.reload — Перезагрузка конфингов плагина
Как установить плагин?
1. Скачайте плагин. 2. Возьмите скачанный файл и перенесите в папку plugins вашего сервера. 3. Перезапустите сервер. 4. Готово.
Информация по созданию
После того как вы в Закладке «Глобальные» нажали кнопку Задания у вас откроется пустое окно со списком Разделов Заданий, полем где вы можете переименовать раздел и кнопками:
- «Категории» — открывает выбранный из списка раздел.
- «Добавить» и «Удалить» — отвечают за добавление нового раздела заданий, далее квестов, и удаление выбранного из списка в центре.
При создании нового раздела рекомендую называть его тематически. Т.е. если у вас цепочка квестов в одном разделе и по сюжету они из темы рыбалки, то и раздел необходимо назвать "Рыбалка". Так как этот раздел у игроков будет указываться в закладке квестов, с этим именем. Выберите из списка или создайте новый Раздел, нажмите кнопку "Категории". И создайте новый Квест кнопкой "Добавить". После того как вы создадите квест в разделе, или выберите его из списка раздела, вам откроется окно управления настройками Квеста:
- Поле «Название» — Название Квеста. Можно свободно изменить в любой момент. Это название будет отображено в окне выполнения квеста. Все квесты можно увидеть в режимах выживания или приключения в верхних закладках внутреннего инвентаря.
- Позиция «Завершения текста», кнопка «Редактировать» — корявый перевод. Текст при завершении, кнопка вызовет окно ввода текста, который игрок увидит в отдельном окне сразу после завершения квеста.
- Позиция «Текст Квеста», кнопка «Редактировать» — откроет окно ввода текста, который будет отображаться в описании задания в закладке на этот квест у игроков.
- Позиция «Тип», кнопки:
- «Задание на вещь», кнопка «Редактировать» — откроет окно настройки задания на поиск предмета. Кнопки «Игнорировать урон» и «Ignore NBT» отвечают за отключение проверки метадаты и тегов предмета или блока. Три ячейки — это места для предметов и в том же количестве, которые игрок должен будет найти.
- «Задание на убийство», кнопка «Редактировать» — откроет окно с тремя полями, в которых вы можете выбрать имена NPC, МОБов из модов и даже Игроков, и указать количество, которое необходимо убивать игроку, чтобы выполнить такой квест.
- «Зона Убийства», кнопка «Редактировать» — похоже с Заданием на убийство, вот только чтобы игроку засчитали убийство NPC, ему необходимо убить всех NPC рядом с ним (пределы 8-12 блоков). (Зелья вам в помощь и ТНТ)
- «Задание на поиск», кнопка «Редактировать» — откроет окно с тремя полями, в которые нужно указать имена Локационных квестовых блоков, которые игрок должен обнаружить, чтобы пройти квест.
- «Задание на диалог», кнопка «Редактировать» — откроет список, где необходимо указать диалог, который необходимо будет прочитать игроку, чтобы выполнить подобный квест. Т.е. как игрок увидит текст этого диалога — квест будет считаться выполненным.
Далее:
- Позиция «Повторяется», кнопки:
- «Нет» — квест выполняется игроком единожды и больше он его взять на выполнение не сможет.
- «Да» — квест можно брать на выполнение в любой момент после его завершения.
- «Раз в день», либо «Раз в неделю» — игрок может брать на выполнение этот квест раз в день или неделю.
Дальше:
- Кнопка «Завершено npc» или «Мгновенно» и поле рядом — определяет как будет завершаться это задание. Либо мгновенно/сразу, как игрок выполнит условия задания на выполнение или ему ещё придётся подойти к NPC, имя которого нужно указать в поле рядом.
- Позиция «Продвинутые», кнопка «Редактировать» — откроет окно дополнительных возможностей, которые будут активированы после выполнения квеста, а именно:
- Позиция «Настройки Фракции», кнопка «Настроить» — установить очки фракции, добавить или убавить по выполнению квеста.
- Кнопка «Установить письмо» и кнопка отмены рядом «Х» — отправить письмо игроку, выполнившему этот квест. Собственно настроить это письмо.
- Кнопка «Следующее задание» и кнопка отмены рядом «Х» — по завершении этого квеста выдать следующий автоматически. Откроет окно выбора квеста.
- Позиция «Консольная команда», кнопка «Настроить» — выполнить команду по завершению этого квеста.
Вернуться к предыдущему разделу: Создание диалогов и связь между ними.
Перейти к последнему разделу: Как добавить свои файлы в игру через CustomNPCs. Музыка, скины, текстуры и т.д.
Просмотр: Шаблон:Custom NPCs/Содержимое